


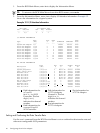

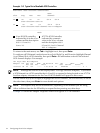

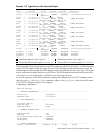
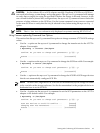

Example 3-7 Typical Device Properties Screen
Device Properties
SCSI Device Identifier MB/Sec MT/Sec Data Scan Scan
ID Width ID LUNs > 0
0 - 320 [160] [16] [Yes] [Yes] *
1 - 320 [160] [16] [Yes] [Yes]
2 - 320 [160] [16] [Yes] [Yes]
3 - 320 [160] [16] [Yes] [Yes]
4 - 320 [160] [16] [Yes] [Yes]
5 - 320 [160] [16] [Yes] [Yes]
6 - 320 [160] [16] [Yes] [Yes]
7 53C1030 320 [160] [16] [Yes] [Yes]
8 - 320 [160] [16] [Yes] [Yes]
9 - 320 [160] [16] [Yes] [Yes]
10 - 320 [160] [16] [Yes] [Yes]
11 - 320 [160] [16] [Yes] [Yes]
12 - 320 [160] [16] [Yes] [Yes]
13 - 320 [160] [16] [Yes] [Yes]
14 - 320 [160] [16] [Yes] [Yes]
15 - 320 [160] [16] [Yes] [Yes]
You can use the Device Properties screen to perform the following tasks:
• Change the SCSI Data Transfer Rate for the entire SCSI bus, or for an individual device
• Change the Data Bus Width for the entire SCSI bus, or for an individual device
• Enable or disable Scan ID
• Turn Disconnect on or off
• Enable or disable Scan LUNs
• Turn Que Tags on or off
• Change SCSI timeout duration
• Restore Default settings
Use the Arrow keys to highlight specific properties for any device on the SCSI bus. If you continue
pressing the Arrow key, moving from left to right in any row on the screen, additional columns
will be displayed. Depending on the selection made, + or - are used to view the options available
for a particular selection. Press Enter to accept the Device Properties that are displayed on the
screen.
NOTE: “Format” and “Verify” do not apply to HP-UX
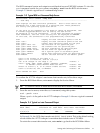
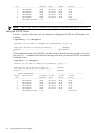
Downloading and Installing a Firmware Image
From the main menu screen, use the Arrow keys to select Download and Install Firmware
Image, then press Enter. A menu listing the available SCSI Ultra320 controllers appears. For
example:
36 Configuring the A7173A Adapter