


SECTION 2
INSTALLATION & SETUP
Installing the Ink Cartridges
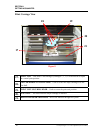
The printer can accommodate 3 HP45A style inkjet cartridges. The cartridges are installed as follows:
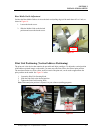
Remove the inkjet cartridge from its packaging, taking
care not to touch the copper contacts or the nozzle
plate. Remove the protective tape from the inkjet
cartridge.
See “
Appendix B” for a list of ink cartridges that are
available for your printer.
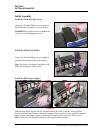
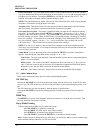
Figure 12
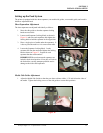
• The cartridges are held in place by a latch lever
mounted on the inkjet cartridge holder (pen stall).
Release the lever by raising it vertical.
• With the cartridge’s nozzle plate pointing down, slide
the cartridge into the pen stall and push down and
toward the contacts in the pen stall. See Figure 12.
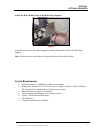
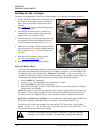
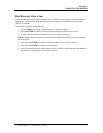
Figure 13
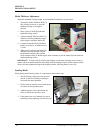
• Make sure the cartridge is seated in the pen stall then
close the latch lever to secure the cartridge in the pen
stall, as shown in Figure 13. Do not force the lever
into place.
• Reset the ink level monitor for this cartridge.
See “
Ink Level Monitor Reset” below.
• Repeat the above for the remaining cartridges.
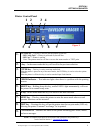
Ink Level Monitor Reset
The printer can automatically calculate the approximate ink level available in each cartridge. It does
this using a drop count method. When the level is calculated as being low (~5% ink remaining in the
cartridge) the printer will stop and display “Head # Low. Press Enter.”. After you press Enter, you
can choose to ignore the warning or you can check the cartridge. If the cartridge is almost empty, you
should replace the cartridge and reset the Ink Level Monitor using the flowing procedure.
Press the MENU key momentarily.
Use the “+” or “-” key to highlight “Enter when head (n) is filled”.
Press the ENTER key and install a new cartridge.
Repeat for each cartridge you install. When the ENTER key is pressed the display will change to
“Head (n) has a new cartridge”.
NOTE: This feature is only valid if the cartridges remain in their original positions, where they were
first installed. If you swap the cartridges from one stall position to another, the calculated ink levels
will not be accurate. It is suggested that you tag the cartridges with their original position number.
Quick Ink Level Monitor Reset (all Heads): Power the printer on while holding down the MENU key,
until the printer displays “Resetting all Ink Levels in Flash”. Then release the MENU key.
To check the level of ink in the cartridges, Press and hold the TEST key until the “Service Menu”
appears. Use the “+” or “-” key to scroll to the “Service Menu: Ink Levels, 100%100%100%”. This
will show how much ink remains in the cartridge.
The ink in the cartridge may be harmful if swallowed. Keep new and used
cartridges out of reach of children. Discard empty cartridges immediately.
Envelope Imager 1.5/1.5 Plus Operations (Rev.6/7/2007)
14