


SECTION 3
OPERATING THE PRINTER
Print Enhancement –The print enhancement feature is used to help the nozzles on the ink cartridge
stay open and decrease the loss of the descender on letters such as “y” or “q” and accent marks that do
not appear in every address. Pressing the ENTER key will turn this function ON or OFF. The
function will remain as changed until the operator changes it again.
NOTE: The Print Enhancement feature will time out after 100 seconds if no media is going through
the printer. Once media is being printed it will restart.
Automatic Feed –Turning the feature ON will cause the printer to automatically start the transport
and feed systems, if the printer is placed on-line before it starts receiving data.
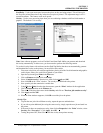
Enter when head (n) filled – The printer is capable of telling you when an ink cartridge is running
low of ink. To use this feature press the MENU key momentarily. Then use the “+” or “-” key to
highlight “Enter when head (n) is filled”. Press the ENTER key and install a new cartridge. Repeat
for each cartridge you install. When the ENTER key is pressed the display will change to “Head (n)
has a new cartridge”. To check the level of ink in the cartridges, Press and hold the TEST key until
the “Service Menu” appears. Use the “+” or “-” key to scroll to the “Service Menu: Ink Levels,
100%100%100%”. This will show how much ink remains in the cartridge.
NOTE: The “Ink Level” feature is only accurate if the cartridges remain in the original positions
where they were first installed. If you swap the cartridges from one pen stall position to another, the
levels will not be accurate.
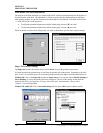
Setup Menu: To access the Setup Menu; press and hold the MENU key until the “Setup Menu”
appears. Step through the Setup Menu items, using the “+” or “-” key.
Total Count – The total count displayed is the total number of prints that have passed through the
printer. It is non-resettable.
BIOS Version – The version of the BIOS is displayed in this menu when the “+” key is pressed
once. From time to time it may be necessary for a technician to upgrade the BIOS in the printer.
When this is done, the new BIOS version can be checked in this manner.
Bulk Ink – This feature is not used. No provisions are made to install bulk ink cartridges.
+ / - (plus / minus) keys
In the various menu modes these keys are used to step through the options.
ON LINE key
Pressing the ON LINE key will cause the printer to change from the on-line state, to the off-line state,
or vice-versa. The LED on this key will slowly flash when there is power present and the printer is off-
line.
The LED on this key will turn on (steady), when the printer is placed on-line.
Pressing the ON LINE key during the printing operation will take the printer off line and stop the
printer.
RESET key
The RESET key is used to clear the printer memory and return it to its initial state (wait state). This
key only functions if the printer is off line.
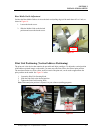
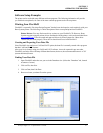
Purge While Printing
To do the purge in the middle of a job, follow these steps:
Press ON LINE key to pause the current job.
Press the MENU key, then step to “Press Enter to Purge”.
Press ENTER key to start the purge. Repeat if necessary.
Press ON LINE key and then the ENTER key to get back to normal printing.
Note. If paper jam occurs during the purge, after purge, you should use address recovery feature to get
back to normal printing. Otherwise you will lose records.
Envelope Imager 1.5/1.5 Plus Operations (Rev.6/7/2007)
20