


2. Review the event logs and cluster logs to verify that there are no critical issues that might affect
the migration. If an Exchange or SQL Server is installed on the cluster, the premigration steps
are similar to those of a standalone Exchange or SQL Server. The only deviation from this
procedure is that you would not need to set services to Manual. (By default, all the Exchange
and SQL Server services are set to Manual.)
3. (Optional) If a file share is present on the cluster, remove sharing access on the file share.
Re-enable sharing access after the migration is finished.
4. Take all the cluster resource groups offline.
5. Verify that the target server has enough disk space both for capacity and performance for the
applications to be migrated.
6. Verify that the application station, source server, and destination server are on the same
network subnet.
7. Shut down all nodes except the one to be migrated.
8. Stop the cluster service on that node.
9. Start the P2P migration - see “Performing the migration” (page 80).
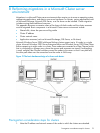
Performing the migration
Perform the migration steps in the migration wizard as in a typical migration. As an example, if
your migration involved two nodes, you must perform P2P migration for two servers.
You must ensure that the Host Bus Adaptors (HBAs) are properly migrated to the new servers and
verify that any established Fibre Channel zones are updated as necessary. Fibre Channel zones
can be based either on the unique World Wide Name (WWN) of the HBA (software-based zoning),
on the switch port (hardware-based zoning), or both. In the software-based zoning case, you must
either transfer the same physical HBAs from the source machine to the destination machine, or
update the Fibre Channel zones with the new World Wide Names of the destination HBAs.
Post migration considerations and steps
After the migration completes:
1. Power down the source server nodes.
2. Boot the destination server nodes.
3. Update the entire destination server using the ProLiant Support Pack (PSP). For more information,
see http://www.hp.com/servers/psp.
4. All source configuration settings will also be transferred to the destination server hence it is
same as the source (like static IPs, node name, domain membership).
5. Present the Quorum disk & shared disks to the destination sever.
6. If required edit the network configuration. By default, the migration process configures the
network cards to use Dynamic Host Configuration Protocol (DHCP). To implement static IP
addressing, apply the static network settings and ensure that the target nodes have the same
the IP address as the previous nodes.
7. Update the boot.ini file with the desired switches as necessary. A copy of the source server
boot.ini entries are within the file and the SMP – P2P application entry can be removed. Set
all memory switches, such as /3gb and /PAE, for use on the desired target server.
8. Verify that the Exchange or SQL databases and log volumes use the same letters as were used
on the source server.
9. Start the cluster service on the migrated node.
10. Start the cluster resources groups.
11. Now power on all the other nodes in the cluster and verify that the nodes can connect to the
cluster.
12. Cluster will run the same as before with our new destination server replacing the old source
server.
13. These steps can be repeated for each node to successfully migrate the full cluster.
14. Perform the Exchange or SQL postmigration steps on the cluster, as described later in this
white paper.
80 Performing migrations in a Microsoft Cluster server environment