8. If the drive is attached through a Diskette Drive
Attachment Unit, replace the unit.
Power Systems Checkout
To verify the symptom of the problem, power-on the
computer using each of the power sources available as
follows.
1. Remove the battery pack, diskette drive, and hard
disk drive.
2. Connect the AC Adapter and check that power is
supplied.
3. Install the diskette drive, or hard disk drive one at a
time and check that power is supplied from each
power source.
4. Disconnect the AC Adapter, remove the hard disk and
diskette drive, and install the charged battery pack;
then check that power is supplied by battery pack.
If you suspect a power problem, see the appropriate power
supply check listed below.
“Checking the AC Adapter.”
“Checking Operational Charging” on page 208.
“Checking the Battery Pack” on page 208.
“Checking the Car-Battery Adapter” on page 210.
“Checking the Quick Charger” on page 211.
“Checking the Backup Battery” on page 211.
“Checking the Standby Battery” on page 212.
“Port Replicator Power Overload” on page 215.
Checking the AC Adapter: You are here
because the computer fails only when the AC Adapter is
used.
If the power problem occurs only when the port
replicator is used, replace the replicator.
If the power-on indicator does not turn on, check the
power cord of the AC Adapter for correct continuity
and installation.
If the operational charge does not work, go to
“Checking Operational Charging” on page 208.
Note: There are two types of adapters. The procedure
for checking both types is the same.
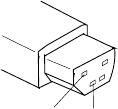
1. Unplug the AC Adapter cable from the computer and
measure the output voltage at the plug of the AC
Adapter cable. See the following figure.
1
2
ThinkPad 355x, 360x, 370C, 750x, 755C, 755Cs 207


