


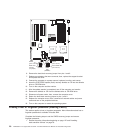
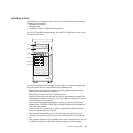
v Your computer comes with adapter connectors or slots. The video adapter is
installed in the PCI Express x16 slot (slot 1). You can install up to five additional
adapters in your computer in PCI slots 2 and 3, and PCI-X slots 4, 5, and 6.
v You can install full-length adapters in PCI slot 3, and PCI-X slots 4, 5, and 6.
However, a full-length adapter will not fit in PCI slot 2 and is not supported. None
of the expansion slots are hot-plug slots.
v Your computer supports 5.0 V signaling and universal PCI 32-bit/33 MHz
adapters in PCI slots 2 and 3.
v Your computer supports 3.3 V signaling and universal PCI-X 64-bit/133 MHz
adapters in PCI-X slot 4.
v Your computer supports 3.3 V signaling and universal PCI-X 64-bit/100 MHz
adapters in PCI-X slot 5 and 6.
v Your computer uses a rotational interrupt technique to configure PCI adapters,
which means that you can install a variety of PCI adapters that currently do not
support sharing of PCI interrupts.
v If you install a ServeRAID 6i+ adapter, it must be installed in PCI-X slot 5.
v If you install an optional RAID adapter in your computer, you must reinstall the
operating system and applications that came preinstalled on your computer.
v The system scans the PCI Express x16 slot (slot 1), PCI expansion slots 2 and
3, and PCI-X expansion slots 4 through 6 to assign system resources. Then, it
starts the PCI devices in the following order, if you have not changed the default
startup sequence: PCI Express x16 slot (slot 1), system-board integrated drive
electronics (IDE), Serial ATA (SATA), or small computer system interface (SCSI)
devices (including optional ServeRAID-6i+ controller), and then PCI-X slots 4
through 6.
v For a list of supported options for your computer, go to http://www.ibm.com/pc/;
then, select your country and navigate to the list of options for your computer.
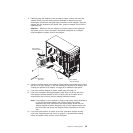
Complete the following steps to install an adapter in your computer:
1. Read the safety information beginning on page 127 and the guidelines in
“Handling static-sensitive devices” on page 23
2. Turn off the computer and all attached devices (see “Turning off the computer”
on page 9); then, disconnect all external cables and power cords.
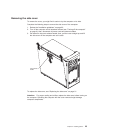
3. Remove the side cover (see “Removing the side cover” on page 25).
4. Determine the slot in which you want to install the adapter. Review the
instructions that come with the adapter for any requirements, restrictions, or
cabling instructions. It might be easier to route any cables before you install
the adapter.
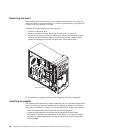
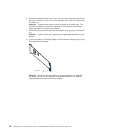
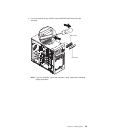
5. For full-length adapters, rotate the rear adapter-retention bracket to the open
(unlocked) position (you might have to first remove any adapters that might be
in the way). Press down on the bottom tab of the front adapter-retention
bracket to release it (the tab is inside the fan compartment that is next to the
front adapter-retention bracket). If you are installing a smaller adapter, rotate
only the rear adapter-retention bracket.
Chapter 4. Installing options 27