


29
ENGLISH
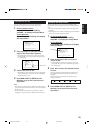
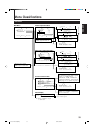
Preventing the Afterimage Effect
After showing the same still picture on the screen, reverse the
color on the screen using this function so that you can avoid
the screen from being burned in with the still picture.
1
On the remote control:
Press MENU/EXIT while holding
VOLUME – to display the Setup Menu.
On the Monitor:
Press MENU while holding 2 to display
the Setup Menu.
2
Press 5/∞ to move the cursor (3) to
“COLOR-REVERSE” (on the second page).
• The Setup Menu consists of two pages. If you keep
pressing 5/∞, you can move to the other page from
the current page.
3
Press 2/3 to select “ON” while
showing the still picture so that you can
avoid the screen from being burned in
with the still picture.
Each time you press the button, the Color-Reverse
function alternates between “ON” and “OFF.”
To cancel the Color-Reverse function, select “OFF.”
4
Press MENU/EXIT (or MENU on the Monitor)
once to exit from the menu operations.
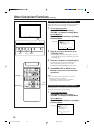
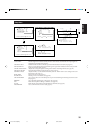
Refreshing the Screen
After the power is turned off, a whitish image may be left on
the screen. In that case, leave the monitor in a white back state
for a while, and the image will disappear.
1
On the remote control:
Press MENU/EXIT while holding
VOLUME – to display the Setup Menu.
On the Monitor:
Press MENU while holding 2 to display
the Setup Menu.
2
Press 5/∞ to move the cursor (3) to
“REFRESH” (on the second page).
• The Setup Menu consists of two pages. If you keep
pressing 5/∞, you can move to the other page from
the current page.
3
Press 2/3 to select the desired setting.
The Setup Menu disappears, and the white screen appears.
To cancel the Refresh function
Repeat steps
1
and
2
, then select “OFF” by pressing 2/3.
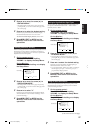
Resetting All the Setup Menu Settings
You can reset all the following Setup Menu settings at a time,
except the use time of the source lamp (HOUR METER).
1
On the remote control:
Press MENU/EXIT while holding
VOLUME – to display the Setup Menu.
On the Monitor:
Press MENU while holding 2 to display
the Setup Menu.
2
Press 5/∞ to move the cursor (3) to
“reset” (on the second page).
• The Setup Menu consists of two pages. If you keep
pressing 5/∞, you can move to the other page from
the current page.
3
Press 3.
The confirmation screen appears.
4
Press 3 again to reset all the Setup
Menu settings.
To cancel the reset, press MENU/EXIT (or MENU on
the Monitor).
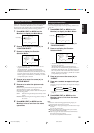
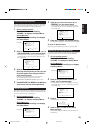
Cursor (3)
AUTO SLEEP
CONTROL LOCK
STATUS DISPLAY
VENTILATION MODE
HD SIGNAL MODE
WHITE BALANCE
SET-UP MENU 1/2
ADJUST:
SELECT:
EXIT:
MENU
: 1MIN.
: ON
: ON
: H
: 1080i
PIXEL SHIFT
POWER SAVE
COLOR-REVERSE
REFRESH
reset
all reset
HOUR METER x1000
SET-UP MENU 2/2
ADJUST:
SELECT:
EXIT:
MENU
: ON
: ON
: ON
: ON
: 001
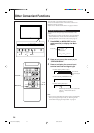
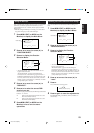
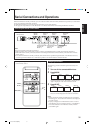
Are you sure?
"YES" then press key.
"NO" then press key
MENU
reset
24-30.GD-V4210PZW[EN]/f 00.9.29, 5:55 PM29