


4
Parts Identification
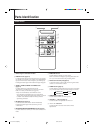
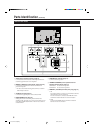
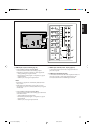
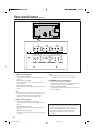
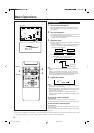
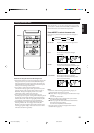
Remote Control
DISPLAY ASPECT POWER
RGB
COMPO.
VIDEO B
VOLUME
MULTIPLE
MODE ID SET
MONITOR ADJUSTMENT
VIDEO A
MUTING
MENU/EXIT
RM-C575 REMOTE CONTROL UNIT
ID
17
8
9
p
q
2
4
3
5
6
6 MENU/EXIT button
Use this button to display or erase menus.
While a sub-menu is displayed, pressing this button will
move you one screen back to the preceding menu.
7 Remote control cable jack (page 31)
Connect the remote control cable when using this remote
control as a wired remote control.
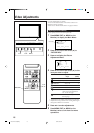
8 ASPECT button (page 15)
Use this button to switch between aspect ratios. Each time
you press the button, the aspect ratio changes as follows:
9 POWER button (page 14)
Use this button to turn on/off the power.
p VOLUME + / – buttons (page 14)
Use these buttons to adjust the volume level.
q 2 / 3 / 5 / ∞ buttons
Use these buttons to select menu items or make
adjustments.
REGULAR FULL
ZOOMPANORAMIC
1 Remote signal transmission window
2 DISPLAY button (page 14)
Use this button to display the input terminal, color system
(for VIDEO A or B input), scan system (for COMPONENT
input) and horizontal/vertical frequency (for RGB input).
Pressing the button again will make the display disappear.
3 VIDEO A, VIDEO B, COMPO. and RGB buttons
(page 14)
Use these buttons to switch between inputs.
To select the correct RGB input, you have to set “RGB
INPUT” correctly on the menu (see page 23).
• Only for GD-V4210PCE, GD-V4210PCE-G and
GD-V4211PCE: Only RGB input can be reproduced.
To reproduce images through the other inputs, you need
to install video interface kit (IF-C421P1W), which is
separately purchased.
4 MUTING button (page 14)
Use this button to turn off the volume immediately.
Pressing the button again will resume the previous
volume level.
5 MULTIPLE MONITOR ADJUSTMENT buttons (page 31)
Use these buttons to set IDs, etc. when serial connection is
made.
04-13.GD-V4210PZW[EN]/f 00.9.29, 5:54 PM4