


36
• Is the power cord disconnected?
•Is the MAIN POWER switch turned on?
•Is the correct input selected?
•Are the devices connected correctly?
•Are signals being supplied from the
connected devices?
•Is RGB INPUT set correctly if using the
RGB terminals?
•Are input signals (scanning frequency,
etc.) appropriate?
•Is brightness adjusted correctly?
•Is volume set at minimum?
•Are the diagnostic lamps turned on?
•Is the signal RGB input?
•Is brightness adjusted correctly?
•Is picture quality (colour density, etc.)
adjusted correctly?
•Is the correct broadcast system (colour
system) selected?
•Are signals (scanning frequency, etc.) to
connected devices appropriate?
•Is the size or position of the screen
adjusted properly?
•Are the batteries correctly set?
•Are the batteries exhausted?
•Is there any object blocking the path
between the remote control and remote
sensor?
•Is the Monitor too far away from you?
•Is the Monitor connected serially to
another Monitor (Serial Connection)?
•Is the Control Lock function in use?
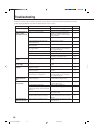
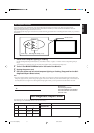
Troubleshooting
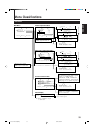
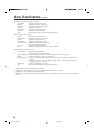
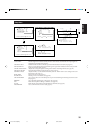
Solutions to common problems related to the Monitor are described here. If none of the solutions presented here solves the
problem, unplug the Monitor and consult an authorized dealer or service center.
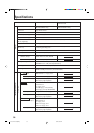
Symptom Probable cause Corrective action Page
•Insert the power cord (plug) firmly.
•Turn on the MAIN POWER switch.
•Select the correct input by pressing
VIDEO A, VIDEO B, COMPO. and
RGB on the remote control (or INPUT
on the Monitor).
•Connect the devices correctly.
•Set the devices correctly.
•Set it correctly.
•Check if the signal is appropriate
(scanning frequency, etc.), and input
the appropriate signal.
•Adjust brightness on the menu.
•Adjust volume.
•Refer to “Self-diagnostic indication,”
and take an appropriate action.
•Adjust CLOCK PHASE using the
menu.
•Adjust BRIGHT (brightness) using the
menu.
•Adjust PICTURE using the menu.
•Set SIGNAL MODE (colour system) to
“AUTO.”
•Check if the signal is appropriate
(scanning frequency, etc.), and input
the appropriate signal.
•Adjust H.SIZE, V.SIZE, H.POSITION
or V.POSITION using the menu.
•Insert batteries correctly, observing the
polarities (ª and ·).
•Replace with new batteries.
•Remove any blocking object.
•Move toward the Monitor, then operate
the remote control.
•Only Master Monitor can be controlled
by the remote control when connected
serially.
•Set the Control Lock function to “OFF”
using the menu.
12
14
14
12, 13
—
23
11
16
14
37
17
16
16
22
11
17
9
9
—
—
31
26
Power is not supplied.
Video image does not
appear, or audio
sound does not occur.
The picture becomes
blurred.
Colour is abnormally
dark or bright.
Colour is poor or
unstable.
The picture is cut or
shifted toward one
side.
The remote control
does not work.
The buttons on the
Monitor do not work.
31-40.GD-V4210PZW[EN]/f 00.9.29, 5:56 PM36