


Chapter 4---Maintenance (Removal/Replacement)
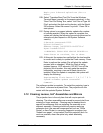
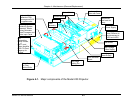
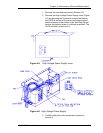
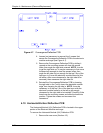
Figure 4-4. Lamphouse Dock and Arc Lamp with cover off.
7. When reinstalling the Arc Lamp, be sure that the
Safety Shutter tab on the left side (Figure 4-4) engages
the left side of the housing so that the Arc Lamp
cooling door opens when the Arc Lamp is installed.
8. After reinstalling the Arc Lamp, perform the Arc Lamp
Focus, Alignment and Current Setting procedures as
shown in Sections 3.1 and 3.2.
To remove the Lamphouse Dock (Ignitor and Laser PS):
1. Remove the Arc Lamp as shown in the above
procedure. Store the Arc Lamp in a safe place.
2. Remove the 5 pozidrive screws securing the
projector’s lower-right-side panel (Figure 4-1) and
remove the panel.
3. Disconnect the fan connector from the Arc Lamp
cooling fan.
4. Disconnect and label the positive and negative cables
from the Arc Lamp Power Supply terminals marked
“DC OUTPUT” (Figure 3-3).
5. Remove the Arc Lamp Air Filter and cover by removing
the 3 pozidrive screws that secure it to the Lamphouse
Dock Assembly.
6. Remove the 3 hex screws at the inside-rear of the
Lamphouse Dock (1 on top and 2 on bottom). The
Lamphouse Dock is now free to return for repair.
7. Replace the Lamphouse Dock in reverse order. NOTE:
When replacing the Lamphouse Dock, be sure the 2
pins on the Collimator Lens line up with the holes on
the rear of the Lamphouse Dock.
Model 200 Service Manual 4-7