


Chapter 3---Service Adjustments
damaging the connector, grasp the ILA
®
assembly itself, not
the connector at the top.
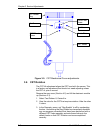
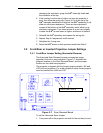
4. If the overlap is at the top or bottom, be sure the projector is
level, then slide the spring clip (Figure 4-12) at the top of the
ILA
®
assembly backward and remove the ILA
®
assembly (it will
slide out with some resistance). There are two adjustment
screws at the bottom of the ILA
®
assembly which allow for up
and down movement. Turn these screws in or out very slightly
to allow the ILA
®
to seat lower or higher, whichever is needed.
5. Reinstall the ILA
®
assembly and replace the spring clip.
6. Repeat Step 4 if adjustment is still needed.
7. Retighten the 2 wing nuts.
8. Reset the ILA
®
biases to their previous levels from Step 2.
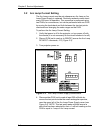
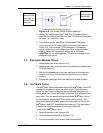
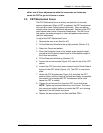
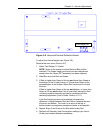
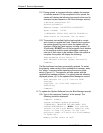
3.9 Front/Rear or Inverted Projection Jumper Settings
3.9.1 Front/Rear Jumper Setting (Horizontal Reverse)
The Horizontal Scan Reversal Jumper reverses the image
projection for front or rear projection. Figure 3-7 illustrates the
jumpers’ location on the Scan Reversal Board, and the proper
location for front and rear projection.
The projector is shipped with the jumper plugs inserted in J50 and
J100 for front projection. For a rear projection setup, these jumpers
must be inserted into JA50 and J101.
HORIZ SIZE COILS
Figure 3-7. Scan Reversal Board.
To set the Horizontal Scan Jumper:
1. Turn power off at the projector and wait for the arc lamp to cool.
Model 200 Service Manual 3-11