


Chapter 3---Service Adjustments
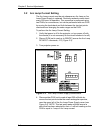
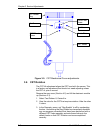
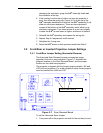
Adjust the Arc
Lamp current
with this pot.
Place the
second DVM,
from Step 3,
across these
terminals.
Figure 3-4. Arc Lamp Power Supply aperture.
5. Multiply the results from Step 2 and Step 3 together (Bear in
mind that the millivolt reading from Step 3 should be interpreted
as amps, i.e. 1millivolt=1 amp).
6. The resulting power from Step 4 should equal 750 watts.
7. If the result is not 750 watts, adjust the trimmer pot (refer to
Figure 3-4). CW=increase, CCW=decrease. If increasing,
notice that the Arc Lamp voltage from Step 2 may decrease
slightly. Adjust the trimmer pot until power is 750 watts.
CAUTION! Do not adjust beyond 775 watts or damage to the
equipment may occur.
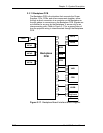
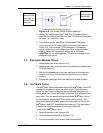
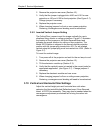
3.3 Electronic Module Tilt-up
1. Remove the rear cover (Section 4.2).
2. Release the clasp on the left side of the electronic module (turn
CCW and pull out).
3. Pull out the release pin on the rear-right side of the electronic
module to tilt it up. Tilt the electronic module up to a vertical
position.
4. Ensure the holding pin locks the electronic module in place.
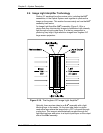
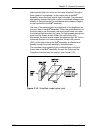
3.4 ILA
®
Back Focus
The ILA
®
Back Focus adjustment moves the ILA
®
/Relay Lens/CRT
assemblies together to adjust the focal length. This adjustment
allows the zoom lens’ tracking to remain focused throughout the
entire range. Use Focus test pattern to perform this adjustment for
each color. This procedure performs the Green ILA
®
Back Focus.
For best results, perform ILA
®
Back Focus with 2 people. One
person will watch the screen close-up and the other will move the
ILA
®
/Relay Lens/CRT assemblies back and forth. The adjustment
is factory-set but may need some touch-up in the field.
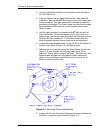
To adjust the ILA
®
Back Focus:
1. Remove the rear cover (Section 4.2).
2. Tilt the Electronic Module up (Section 3.3).
3. For this procedure, view Green. Hide Red and Blue.
Model 200 Service Manual 3-5