


Removing a memory module
Attention: Do not open your server or attempt any repair before reading and understanding the “Safety information”
on page iii and “Guidelines” on page 17.
This section provides instructions on how to remove a memory module.
To remove a memory module, do the following:
1. Remove all media from the drives and turn off all attached devices and the server. Then, disconnect all
power cords from electrical outlets and disconnect all cables that are connected to the server.
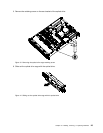
2. Remove the server cover. See “Removing the server cover” on page 19.
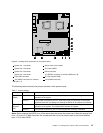
3. Locate the memory slot with the memory module that you want to remove. See “Locating parts on the
system board” on page 14
for the locations of the memory slots.
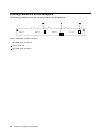
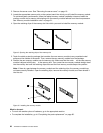
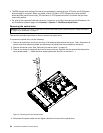
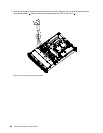
4. Carefully open the retaining clips on each end of the memory slot and then grasp the memory module
straight up by its edges.
Figure11. Removing the memory module
5. If you are instructed to return the failing memory module, follow all packaging instructions and use any
packaging materials that are supplied to you for shipping.
What to do next:
• To work with another piece of hardware, go to the appropriate section.
• To complete the removal procedure, go to “Completing the parts replacement” on page 65.
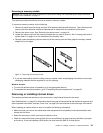
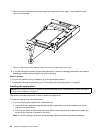
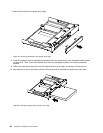
Removing or installing internal drives
This section provides instructions on how to remove or install internal drives for the server.
See “Specications” on page 5 for information about the types of internal drives that the server supports and
other important information, and see “Front view” on page 9 for the locations of the drive bays in the server.
When installing an internal drive, be sure to consider the following information:
• Make sure that you have all the cables and other equipment that is specied in the documentation that
comes with the drive.
• Select the drive bay in which you want to install the drive.
• Check the instructions that come with the drive to see whether you have to set any switches or jumpers
on the drive. If you are installing a SAS device, be sure to set the SAS ID for that device.
Chapter 5. Installing, removing, or replacing hardware 23