


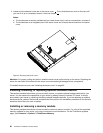
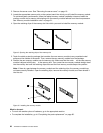
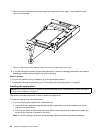
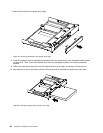
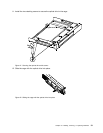

7. Remove the two retaining screws that secure the optical drive in the cage. Then, slide the optical
drive out of the cage.
Figure15. Removing the two retaining screws that secure the optical drive in the cage
8. If you are instructed to return the removed optical drive, follow all packaging instructions and use any
packaging materials that are supplied to you for shipping.
What to do next:
• To work with another piece of hardware, go to the appropriate section.
• To complete the removal procedure, go to “Completing the parts replacement” on page 65.
Installing the optical drive
Attention: Do not open your server or attempt any repair before reading and understanding the “Safety information”
on page iii and “Guidelines” on page 17.
This section provides instructions on how to install the optical drive.
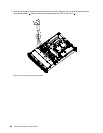
To install the optical drive, do the following:
1. If you are replacing the optical drive, make sure that:
• You have all the cables and other equipment that is specied in the documentation that comes
with the new optical drive.
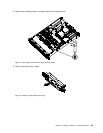
• You have checked the instructions that come with the new optical drive to determine whether you
must set any switches or jumpers in the drive.
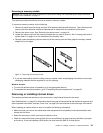
Note: If you are installing a drive that contains a laser, observe the following safety precautions.
26 ThinkServer Installation and User Guide