


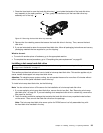
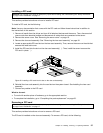


6. Refer to “Removing a PCI card” on page 37 and follow those instructions to remove the RAID controller
from the riser card assembly.
Note: Depending on your RAID controller, if necessary, remove the RAID battery from the RAID
controller by removing the screws that secure the battery on the controller and disconnecting any cables.
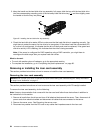
7. If you are instructed to return the RAID controller, follow all packaging instructions and use any
packaging materials that are supplied to you for shipping.
What to do next:
• To work with another piece of hardware, go to the appropriate section.
• To complete the removal procedure, go to “Completing the parts replacement” on page 65.
Installing the ThinkServer 8708ELP SAS RAID Adapter
Attention: Do not open your server or attempt any repair before reading and understanding the “Safety information”
on page iii
and “Guidelines” on page 17.
This section provides instructions on how to install the ThinkServer 8708ELP SAS RAID Adapter (hereafter
referred to as the RAID controller within this section).
To install the RAID controller, do the following:
Note: Use any documentation that comes with the RAID controller and follow those instructions in addition
to the instructions in this section.
1. Remove all media from the drives and turn off all attached devices and the server. Then, disconnect all
power cords from electrical outlets and disconnect all cables that are connected to the server.
2. Remove the server cover. See “Removing the server cover” on page 19.
3. Touch the static-protective package that contains the RAID controller to any unpainted surface on the
outside of the server. Then, remove the RAID controller from the package.
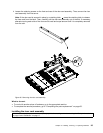
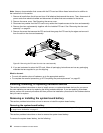
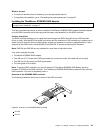
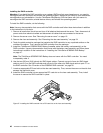
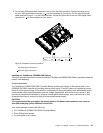
4. Depending on your RAID controller, you might need to install a ThinkServer 8708ELP SAS RAID adapter
battery (hereafter referred to as the battery card assembly) on the RAID controller. The battery card
assembly mounts directly to the RAID controller using a small board-to-board connector (daughtercard).
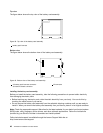
To install the battery card assembly on the RAID controller, do the following:
Notes:
a. The battery card assembly protects the integrity of the cached data on the RAID controller by
providing backup power up to 72 hours in the case of a complete ac power failure or a brief power
outage. It has built-in functionality to charge the battery pack automatically and to communicate
battery status information such as voltage, temperature, and current to your server. It also provides
an inexpensive alternative to using an uninterruptible power supply, and a second level of fault
tolerance when used in conjunction with an uninterruptible power supply. For more information about
the battery card assembly, see Appendix A “RAID battery card assembly” on page 101
.
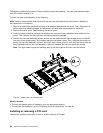
b. The battery card assembly option kit contains a user guide, the battery card assembly, and three
Phillips-head screws. Do not remove the battery card assembly from the antistatic shipping
container until you are ready to install it. When you remove the battery card assembly from your
server, place it in its original container.
c. Check the appropriate support Web sites for the latest updates for your basic input/output system
(BIOS) code, utility programs, device drivers, and other software applications. Follow the instructions
provided by your Service Provider to download and install updates.
d. It is recommended that you replace the battery pack on the battery card assembly annually or after
500 recharging cycles, whichever comes rst.
Chapter 5. Installing, removing, or replacing hardware 41