


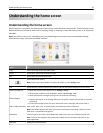


Activating the home screen applications
Your printer comes with preinstalled home screen applications. To use these applications, activate and set up these
applications using the Embedded Web Server. For more information about accessing the Embedded Web Server, see
“Accessing the Embedded Web Server” on page 30.
For detailed information about configuring and using the home screen applications, visit the Lexmark Web site at
http://support.lexmark.com.
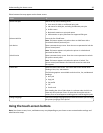
Setting up Forms and Favorites
Icon Description
The application helps you simplify and streamline work processes by letting you quickly find and print
frequently used online forms directly from the home screen.
Note: The printer must have permission to access the network folder, FTP site, or Web site where the
bookmark is stored. From the computer where the bookmark is stored, use sharing, security, and
firewall settings to allow the printer at least a read access. For help, see the documentation that
came with your operating system.
1 Open a Web browser, and then type the printer IP address in the address field.
Note: View the printer IP address on the printer control panel home screen. The IP address appears as four sets
of numbers separated by periods, such as 123.123.123.123.
2 Click Settings > Device Solutions > Solutions (eSF) > Forms and Favorites.
3 Define the bookmarks, and then customize the settings.
4 Click Apply.
To use the application, touch Forms and Favorites on the printer home screen, and then navigate through form
categories, or search for forms based on a form number, name, or description.
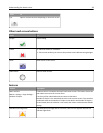
Setting up Scan to Network
Icon Description
The application lets you capture a digital image of a hard‑copy document and route it to a shared network
folder. You can define up to 30 unique folder destinations.
Notes:
• The printer must have permission to write to the destinations. From the computer where the
destination is specified, use sharing, security, and firewall settings to allow the printer at least a
write access. For help, see the documentation that came with your operating system.
• The Scan to Network icon appears only when one or more destinations are defined.
1 Open a Web browser, and then type the printer IP address in the address field.
Note: View the printer IP address on the printer control panel home screen. The IP address appears as four sets
of numbers separated by periods, such as 123.123.123.123.
2 Click Settings > Device Solutions > Solutions (eSF) > Scan to Network.
Setting up and using the home screen applications 32