


Change one of the following tray settings:
• Paper Type
Paper Type names describe the paper characteristics. If the name that best describes your paper is used by linked
trays, assign a different Paper Type name to the tray, such as Custom Type [x], or define your own custom name.
• Paper Size
Load a different paper size to automatically change the Paper Size setting for a tray. Paper Size settings for the
multipurpose feeder are not automatic; they must be set manually from the Paper Size menu.
Warning—Potential Damage: Do not assign a Paper Type name that does not accurately describe the type of paper
loaded in a tray. The temperature of the fuser varies according to the specified Paper Type. Prints may not be
properly processed if an inaccurate Paper Type is selected.
Creating a custom name for a paper type
If the printer is on a network, you can use the Embedded Web Server to define a name other than Custom Type [x] for
each of the custom paper types loaded into the printer.
1 Type the printer IP address into the address field of your Web browser.
Note: If you do not know the IP address of the printer, then you can:
• View the IP address on the printer control panel in the TCP/IP section under the Networks/Ports menu.
• Print a network setup page or the menu settings pages and locate the IP address in the TCP/IP section.
2 Click Settings > Paper Menu > Custom Name > type a name > Submit.
Note: This custom name will replace the Custom Type [x] name under the Custom Types and Paper Size and
Type menus.
3 Click Custom Types > select a paper type > Submit.
Assigning a custom paper type name
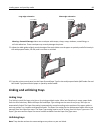
Assign a custom paper type name to a tray when linking or unlinking trays.
From the home screen, navigate to:
> Paper Menu > Paper Size/Type > select a custom paper type name > select a tray > Submit
Configuring a custom name
If the printer is on a network, then you can use the Embedded Web Server to define a name other than Custom Type [x]
for each of the custom paper types loaded into the printer.
1 Type the printer IP address in the address field of your Web browser.
Note: If you do not know the IP address of the printer, then you can:
• View the IP address on the printer control panel in the TCP/IP section under the Networks/Ports menu.
• Print a network setup page or the menu settings pages and locate the IP address in the TCP/IP section.
2 Click Settings > Paper Menu > Custom Types > select the custom name you want to configure > select a paper or
specialty media type > Submit.
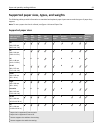
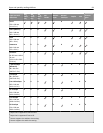
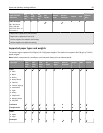
Loading paper and specialty media 89