


7-3
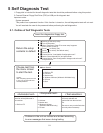
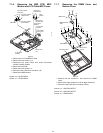
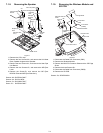
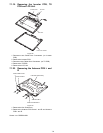
7.1.6. Removing the KBD PCB, MDC
Modem and LCD Cable/MIC Frame
Figure 5
1. Remove the LCD Cable/MIC Frame.
2. Remove the two Screws. <H>
3. Disconnect the three Cable from three Connectors
(CN930, CN950, CN952).
4. Remove the KB PCB.
5. Remove the two Screws. <I>
6. Disconnect the Cable from Connector. (J2)
7. Remove the MDC Modem.
Screws <H>: DFHE5025XA
Screws <I>: DFHE5025XA
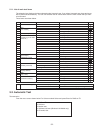
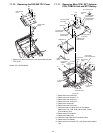
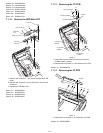
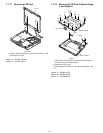
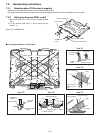
7.1.7. Removing the DIMM Cover and
Bottom Cover
Figure 6
1. Remove the four Screws<J>, and remove the DIMM
Cover.
2. Remove the eight Screws<K> and the eight Screws<L>.
3. Disconnect the Cable from Connector (CN12).
Screws <J>: DRQT26+D4FZLT
Screws <K>: DRQT26+D4FZLT
Screws <L>: DRSB3+8FKL
<H>
<H>
<I>
<I>
Connector CN950
(front side)
Connector CN930
(reverse side)
MDC
Modem
KBD PCB
Connector CN952
(reverse side)
to Connector
(CN950)
to Connector
(CN952)
LCD Cable/
MIC Frame
to Connector
(J2)
Connector J2
(reverse side)
Connector J1
(reverse side)
to Connector
(CN930)
<L>
<L>
<K>
<L>
<J>
<J>
<J>
<J>
<L>
<L>
<L>
<L>
<K>
<K>
<K>
<K>
<K>
<K>
<K>
DIMM Cover
Bottom Cover
Connector CN12
to Connector
(CN12)
<L>
DIMM Radiation
sheet