


SMART 116 IP
23
23. Starting a remote session
At a Client computer open Internet Explorer (6.0 and above) and type the Smart
116 IP’s IP address. https://IP address. (Note! Only SSL connections are allowed,
therefore type HTTPS before the IP address or the name of the Smart 116 IP). The
Login page appears. Type your username and password and press Enter. By
default, the user name is: admin and the password is access, (both lower case).
On first connection install the Minicom certificate and ActiveX control. You must
login as an Administrator to your computer to install the ActiveX control. Once the
ActiveX control is installed, all types of users can login.
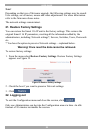
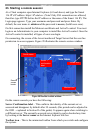
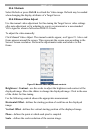
On connecting, the screen of the lowest numbered Target Server that the user has
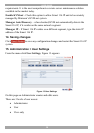
permission to access appears. Figure 20 illustrates the remote session window.
Server
confirmation
label
Toolbar icon
Server name
Minicom icon
Remote
screen
border
Figure 20 Remote console window
On the remote console you have the following:
Server Confirmation label – This confirms the identity of the current server
accessed and disappears by default after 30 seconds, (this period can be adjusted in
the OSD – explained in Section II of the guide). It appears again when switching to
a different server. The currently accessed server identity can be checked any time
by looking at the Server name on the Internet Explorer title bar.
Toolbar icon – This is the minimized toolbar from which you switch and configure
the system.