


SMART 116 IP
45
Please note!
All the functions set out in the Help window are performed from the Main window.
The Help window is merely a reminder of the hotkeys and their functions.
26.10 Scanning computers – F4
Where necessary adjust the scan time in the Time Settings window, see above.
To activate scanning:
1. Press Shift twice to open the OSD.
2. Press F4. Your screen displays each active computer sequentially, with the Scan
label appearing in the top left corner.
To deactivate scanning:
Press F4.
26.11 Tuning – F5
You can tune the image of any computer screen from the Select Computer window.
To adjust the screen image:
1. Navigate to the computer you wish to adjust.
2. Press F5. The screen image of the selected computer appears, together with the
Image Tuning label.
3. Adjust the image by using the Right and Left Arrow keys.
4. When the image is satisfactory, press Esc.
Note! Picture quality is relative to distance. The further away a remote computer is
from the Smart 116 IP, the lower the image quality, and the more tuning needed.
So place the higher resolution computers closer to the Switch.
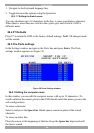
26.12 Moving the label – F6
Position the Confirmation label anywhere on the screen.
To position the label from the Main window:
1. Navigate to the desired computer using the Up and Down arrow keys.
2. Press F6. The selected screen image and Identification label will appear.
3. Use the arrow keys to move the label to the desired position.
4. Press Esc to save and exit.