


MultiModemISI Hybrid Series, ISIHI-2S 19
Hardware Installation
Installing the ISIHI-2S
Installing the ISIHI-2S includes setting the I/O address DIP switches and the IRQ jumper.
You can skip this this section if you select the default values. Default values are I/O
address: 210 hex and IRQ: 10.
1. Before handling the ISIHI-2S, discharge any static in your body by toucing a piece of
grounded metal such as the computer chassis.
2. Carefully remove the ISIHI-2S from its anti-static bag, handling it only by the
mounting bracket and edges. Do not touch the gold-plated connectors along the
bottom edge. (You may want to save packaging for future use.)
3. Visually inspect the ISIHI-2S. If you have any concerns about its condition, call
Technical Support at (612) 717-5863.
4. Make sure your computer and any peripheral equipment connected to it are turned
off. Failure to do so can damage both the ISIHI-2S card and your PC.
You can install the ISIHI-2S in a PC-AT, 386, 486, or Pentium equivalent ISA bus
computer.
5. Remove the cover of your computer as instructed in your computer’s documentation.
6. Locate the unused slot you will be using for your ISIHI-2S card and remove the slot
cover according to instructions in your computer’s documentation.
7. Check the settings of the I/O address switch and the IRQ jumper to ensure they are
set properly for your installation.
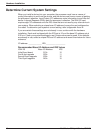
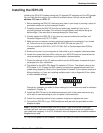
8. The default for the ISIHI-2S’s base I/O address is 210 hex. The default value for the
IRQ jumper is 10. Choose the IRQ value by covering the appropriate pins with the
jumper plug (supplied). Refer to the figure below, if needed. If your system requires a
different setting, or if you are installing multiple cards, refer to Appendix B for a table
of valid address settings.
21435768
OPEN
45
71210 1511
3
IRQ
2
Record any changes you make to these settings for future reference and for software
installation (Chapter 3).
9. Install the ISIHI-2S card in the selected expansion slot in the same manner as any
other add-on card according to your computer’s documentation.
10. Fasten the retaining bracket to the computer chassis and replace the cover.
11. Connect the ISIHI-2S to your ISDN telelphone wall jack with the provided modular
telephone cable.
Note: The ISIHI-2S communicates over ISDN lines. If you do not have a standard
modular wall jack near your computer, you should install one or have one installed by
your telephone company. In the US, installation kits and adapters are available wherever
telephones are sold.
12. Turn on the power to the computer. Now you are ready to install the software/drivers.