3. Printer
26
3.1.1 Using the manual input tray
You can print not only on plain paper but also on special
media (transparencies / labels / envelopes).
The manual input tray is used only for printing with the
computer and can hold one page at a time. When
printing multiple pages, add a next page after the first
page has been fed into the unit.
L Please refer to page 89 for information on recording
paper.
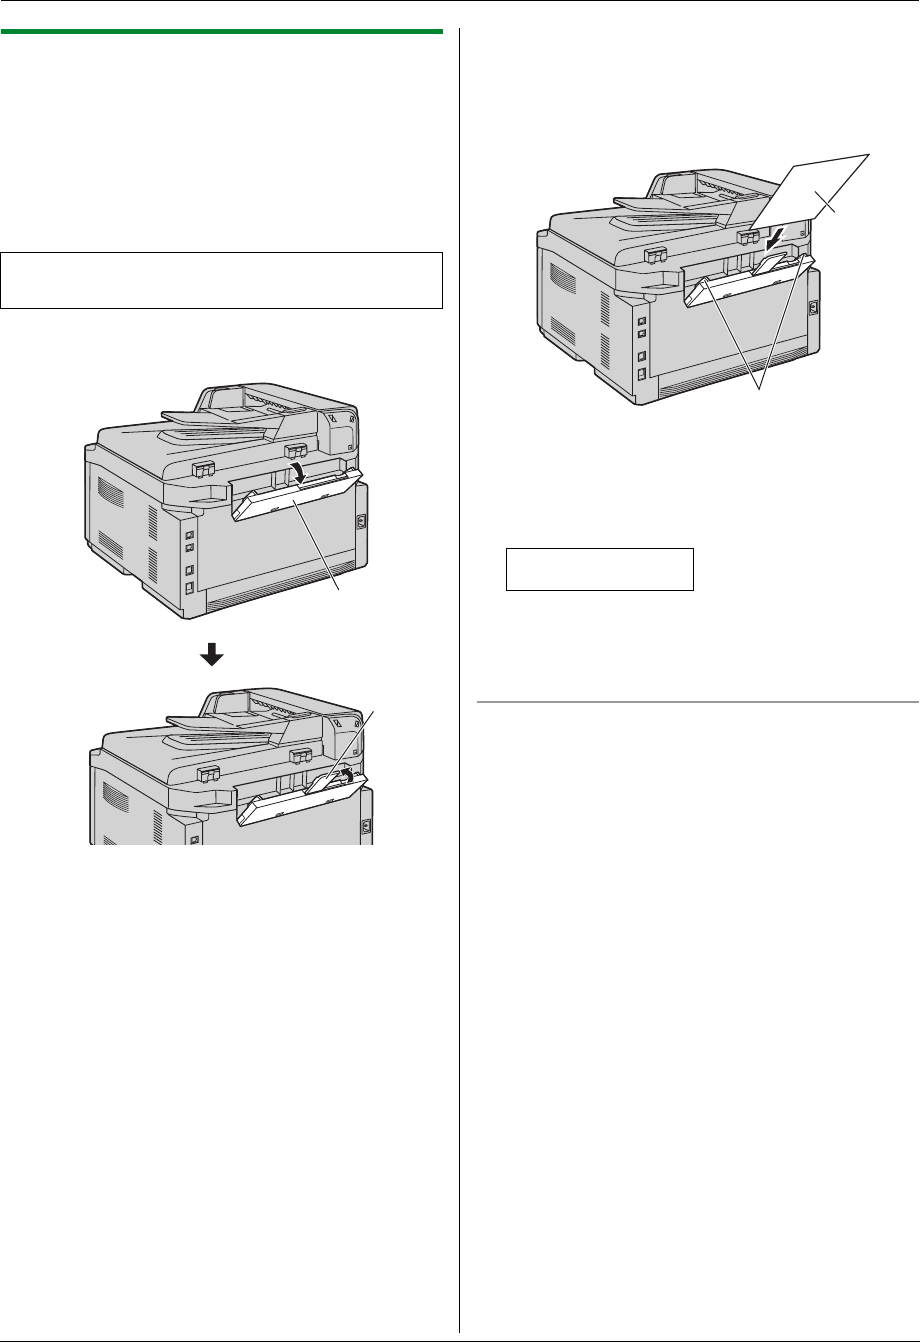
1 Pull open the manual input tray (1), and then raise
the extender (2) gently until it clicks into place.
2 Insert the paper, print-side down (1) until the unit
grasps the paper and a single beep is heard.
L Adjust the width of the guides (2) to the size of
the recording paper.
Note:
L If the paper is not inserted correctly, re-adjust the
paper, or the paper may jam.
L Make sure the unit grasps the recording paper as
specified in step 2. The display shows the following.
PAPER IN TRAY #2
FOR PC PRINTING
L To use the manual input tray, you must change the
paper source in the [Basic] tab when setting the
printer properties (page 25). You can also select the
desired media type.
To print on transparencies
Use transparencies designed for laser printing.
We recommend the following:
3M
®
CG3300/CG5000
L Use the manual input tray to print
transparencies.
L Load transparency sheets one page at a time for
printing, print-side down.
L Printed transparency will be stacked on the
upper output tray.
L Remove each transparency after printing and
place it on a flat surface to cool and to prevent it
from curling.
L Do not re-use transparencies that have already been
fed through the unit. This includes transparencies
that have been fed through and ejected without being
printed on.
L Some types of transparencies have instructions
recommending which side to print on. If the print
quality is poor, try printing on the other side of a new
transparency.
Load the recording paper after you have started
printing with the computer.
1
2
1
2
FLB881-PFQX2732ZA-OI-en.book Page 26 Wednesday, July 18, 2007 11:22 PM


