


6. Fax
42
6.5 Sending a computer
document as a fax message from
your computer
You can access the fax function from a Windows
application using Multi-Function Station.
For example, to send a document created from
WordPad, proceed as follows.
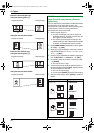
1 Open the document you want to send.
2 Select [Print...] from the [File] menu.
L The [Print] dialog box will appear.
3 Select the PCFAX unit’s name as the active printer.
4 Click [Print] or [OK].
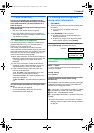
L The [Send a Fax] dialog box will appear.
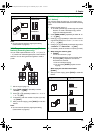
5 Enter the fax number using the keypad display or the
directory.
L To stop the operation, click [Cancel].
6 [Send]
L The document will be sent through the unit from
your computer.
Note:
L To stop sending, see page 65.
L If the document exceeds the memory capacity of the
unit, sending will be canceled.
L For details, see the help file by selecting [p] from
Multi-Function Station.
L Click [Select...] to change the active unit.
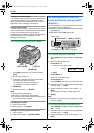
Receiving Faxes
6.6 Receiving a fax automatically
– Auto answer ON
Note:
L Received documents will be stacked on the lower
output tray. You can change the output tray for faxing
(Feature #441 on page 56).
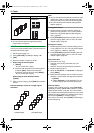
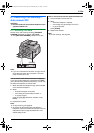
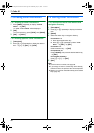
6.6.1 Activating FAX ONLY mode
Press {FAX AUTO ANSWER} repeatedly to display
“FAX ONLY MODE”.
L The display will show the ring count in FAX ONLY
mode. If you wish to change it, press {V} or {^}
repeatedly to display the desired setting, and press
{SET}.
L The {FAX AUTO ANSWER} indicator turns ON.
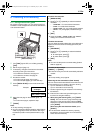
How faxes are received
When receiving calls, the unit will automatically answer
all calls and only receive fax documents.
Note:
L The number of rings before a call is answered in FAX
ONLY mode can be changed (feature #210 on page
52).
If you have subscribed to a Distinctive Ring service
See page 49.
{SET}{V}{^}
FLB881-PFQX2732ZA-OI-en.book Page 42 Wednesday, July 18, 2007 11:22 PM