


40
status of the transmit clock.
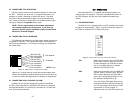
ALM The alarm LED indicates the presence of a
Blue or Yellow Alarm, or Out of Frame con-
dition. The ALM LED will blink on every half-
second. Alarms may occur due to:
•
Loss of Synchronization
• Loss of Frame
• AIS (Blue Alarm)
• RAI (Yellow Alarm)
ERR The error LED indicates various error condi-
tions, including framing bit errors, excessive
zeros, controlled slips, severe errors, or bit
errors (when sending V.52 test patterns).
When sending a test pattern, the LED will
remain lit if the unit does not receive the
identical pattern. When it receives the cor-
rect pattern, the LED will turn off. If error
insertion is on, the LED will blink once a
second if everything is operating properly.
TST The test indicator LED blinks with a specific
pattern depending on the type of test mode.
When the unit is in local analog loop, the
LED will blink on briefly. When the unit is in
remote loop, the TST LED will blink off
briefly. When the unit is sending a test pat-
tern or is putting the remote unit into
V.54/CSU loopback, the TST LED will stay
on. These are the test modes:
• V.54/CSU Loopback & V.52 Patterns
• Local Loopback
PWR The power indicator LED will remain lit while
the unit is powered. It turns off when the
unit is not powered.
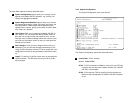
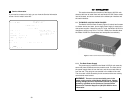
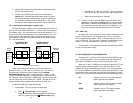
5.2 LOOP (V.54 & TELCO) DIAGNOSTICS
The NetLink-E1™ offers three V.54 loop diagnostics and is com-
patible with two Telco loop diagnostics. Use these diagnostics to test
the CSU/DSU and any communication links. These tests can be acti-
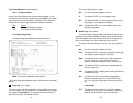
vated via the software control port (See Section 3.2.3 System
Diagnostics), via signals on the serial port interface or the front panel
switch.
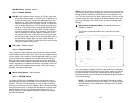
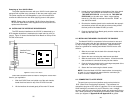
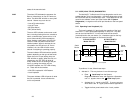
5.2.1 Operating Local Loopback (LL)
The Local Loopback (LL) test checks the operation of the local
NetLink-E1™, and is performed separately on each unit. Any data
sent to the local NetLink-E1™ in this test mode will be echoed
(returned) back to the user device (i.e., characters typed on the key-
board of a terminal will appear on the terminal screen).
To perform a LL test, follow these steps:
1. Activate LL. This may be done in one of three ways:
a. Enter Local Loop from the System
Diagnostics/Statistics menu and toggle the <Spacebar>
until LL appears next to the Local Loop option.
b. Activate the LL signal on the DTE. If you are not sure
which lead is the LL signal, please refer to Appendix D.
c. Toggle the front panel switch to the Local position.
39
Figure 7. Local Loopback
Serial
Device
Serial
Device
Receive
Recover
Clocking
Internal
Clocking
Cable Span
G.703/G.704 NTU
Model 2701 RC
G.703/G.704 NTU
Model 2701 RC
Clock/
Data
Clock/
Data
Clock/
Data
Data
Data
Model 2701RC
Model 2701 RC
LLB Initiated
a
a