


Pelco Manual C523M-H (6/05) 23
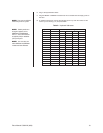
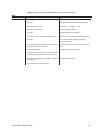
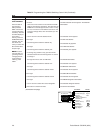
Table B. Programming the CM6700 Switching Control Unit (Continued)
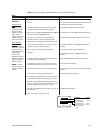
Step 3
Function Action Result
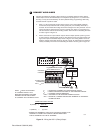
a. Enter the Main Menu.
b. Press 1.
c. Enter the desired camera number (01-16) or pan
left/right to show the desired camera number.
d. Move down to highlight the CAMERA TITLE (CAM NN)
field (the line below CAMERA TITLE).
e. Use the F1 and F2 keys to scroll through the
available characters. There are 26 upper case
letters, 26 lower case letters and the numbers 0-9.
f. When you find the character you want for the first
position, pan right to the next position.
g. Use F1 and F2 to find the second character.
h. Pan right.
i. Continue selecting characters until the title field is
completed (up to 20 characters).
j. To change any position’s entry, pan left until the
character flashes and use F1 and F2 to change it.
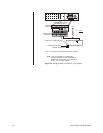
k. When finished, move down to the RX TYPE field.
l. Use F1 and F2 to find the desired protocol.
m. To program another camera, go to step n. When you
have finished programming cameras, go to step o.
n. Move up to the CAMERA NN field and go back to
step c to program another camera. When you have
finished programming cameras, go to step o.
o. Move down to RETURN and pan right to go back to
the Main Menu.
p. Go to another step or press 9 to exit.
The Main Menu appears.
The Camera NN screen appears. NN is the camera
number. The camera number flashes.
The selected number appears on screen.
The first position in the CAMERA TITLE field flashes.
The first position shows the character you are on.
The second position in the CAMERA TITLE field
flashes.
The second position shows the character.
The third position in the CAMERA TITLE field
flashes.
The CAMERA TITLE field shows the entire title.
The new character flashes.
The current protocol setting for the selected camera
flashes.
The selected protocol appears.
The Main Menu appears.
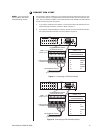
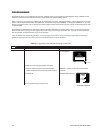
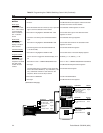
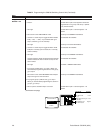
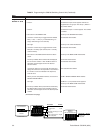
Program
Cameras
Assign Camera
Titles: Up to 20
alpha or numeric
characters can be
assigned to help
identify on-screen
video. This will
appear with camera
number, time and
date on the monitor.
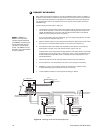
Select Receiver
Protocol: Type of
receiver communi-
cation you will use to
control a camera’s
pan and tilt and lens
(if applicable).
Choose from
Standard Coaxitron,
Extended Coaxitron,
Pelco D protocol or
Pelco P protocol.
NOTE:
P and D
protocols cannot be
mixed in the same
system.
Enter Camera #.
Enter Camera Title
(1-20 characters).
Select Receiver Type
(Std. Coaxitron, Ext.
Coaxitron, 422D, or
422P).
Keypad
F1/F2
F1/F2 or
Pan L/R
PROCEDURE METHOD
CAMERA XX
CAMERA TITLE
CAM O1
RETURN
RX TYPE: 422P