


Service 31
EN
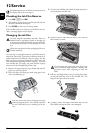
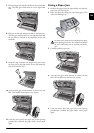
3 Open the scanner cover and the cover of the automatic
document cover by first pushing the support (A) and
then the support (B) inside. The cover (C) folds below.
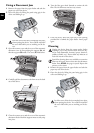
4 Lightly wipe the upper side of the scanner glass (A) and
the lower side of the document feeder/scanner film (=
white plastic plate) (B) with a cloth.
5 Clean the feed roller (A) and the underside of the sup-
port pad of the feeder roller (B) with a soft, lint-free
cloth moistened with cleaning alcohol (96 percent).
Rotate the feed roller; You must clean the entire roller.
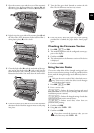
6 Close the scanner cover and the cover of the automatic
document feeder. Both the supports must securely snap
into place.
7 Turn the blue gear wheel forward to tension the ink
film. The ink film must not have any creases.
8 Close the device. Insert the paper tray in the opening
provided for it behind the paper feeder. Insert paper
again.
Checking the Firmware Version
1 Press OK, 47 and OK.
2 The model designation and the configured country ap-
pear on the display.
3 Confirm with OK.
4 The information on the firmware version of the device
is displayed.
5 Confirm with OK.
Using Service Codes
The service codes delete all the changed settings and your
device is reset to factory settings. It may be possible that the
device with the changed settings reacts differently than ex-
pected.
Using Se rvice Codes
1 Press OK, 45 and OK.
2 Enter a service code:
7117—Deletes all changed settings and saved
data. The device is reset to factory settings and the initial
installation process is started.
7140—Deletes all changed settings. Saved data
and telephone book entries remain intact.
7227—Deletes saved faxes, when there are
problems with printing.
3 Confirm with OK.
4 Using [ select
SURE: YES.
5 Confirm with OK.
Only use the service codes if this is absolutely neces-
sary. Some service codes also delete saved messages
and telephone book entries.
If you have entered the incorrect code, you can
cancel the entry with
SURE: NO.