


Specifications and Controls
MAIN COMPONENTS
ActivMedia robots are composed of several main parts:
Deck
Motor Stop Button
User Control Panel
Body, Nose, and Accessory Panels
Sonar Array(s)
Motors, Wheels, and Encoders
Batteries and Power
Deck
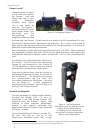
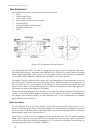
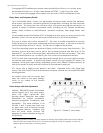
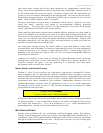
Figure 10. Components of the Pioneer 3
The original Pioneer 2-DX, CE, and AT decks are one piecethe top plate of the robot.
The newer DXe and AT, and now the DX8/DX8 Plus, AT8/AT8 Plus, and Pioneer 3 models
have hinged top-plates which give you much easier access to the internal components
of the robot. See Chapter 8, Maintenance & Repair, for access details.
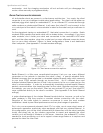
The robot’s deck is simply the flat surface for mounting projects and accessories, such as
the PTZ Robotic Camera and the laser range finder. Feed-through slots on each side of
the DX deck let you conveniently route cables to the accessory panels on the side
panels of the robot. A removable plug in the middle of the deck on all models gives you
convenient access to the interior of the robot.
When mounting accessories, you should try to center the robot's payload over the drive
wheels. If you must add a heavy accessory to the edge of the deck, counterbalance
the weight with a heavy object on the opposite end. A full complement of batteries
helps balance the robot, too.
Motor Stop Button
All new Pioneer 3-AT and, upon request, some new Pioneer 3-DX robots have a STOP
button at the rear of the Deck. Press and release it to immediately disengage the robot’s
motor power. It will also cause a stall and result in incessant beeping from the onboard
piezo speaker (see User Controls below).
Press the STOP button in to re-engage motor power and stop that incessant beeping
noise. Note that you may also have to re-engage the motor controls when connected
with a client, either by manually pressing the MOTORS button on the User Control Panel, or
through a special client command. Read on…
12