


ActivMedia Robotics
Chapter 5
Joydrive and Self-Tests
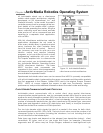
Although not all models come standard with a joystick port, your robot’s H8S-based
controller has a joystick connector and AROS contains a joydrive server for manual
operation.
13
And AROS comes with a short self-test routine for your robot’s drive system.
To run in either joydrive or self-test mode, start up or RESET the robot into its AROS wait
state. You may press the RESET button at any time to disable self-test and joydrive
modes. You have about 10 seconds to engage and complete the joystick calibration
and begin driving the robot or to enter into motors self-test mode before the controller
automatically cancels joydrive mode and reverts to waiting for a client connection.
You may also enable AROS’ joydrive server while connected with a client by sending the
client command number 47 with the integer argument 1.
JOYDRIVE MODE
To joydrive your robot when not connected with a client program, switch the robot’s
Main Power ON or RESET the controller, then press the white MOTORS button on the User
Control Panel once. Listen for a rhythmic, low-tone beeping indicating joydrive mode.
To joydrive your robot while it is connected with a client (overrides client-based drive
commands for manual operation while recording a map, for instance), you must have
the client software send the AROS command #47 with an integer argument 1 to enable
the joydrive servers. The first time you press and release the joystick fire button after AROS
receives the command, you engage self-calibration mode (see below). Have your client
send the AROS joydrive command #47 with an integer argument of 0 to disable the
joystick drive-override.
The joystick is self-calibrating: When you first enable joydrive mode, either by the client
command or when in self-test joydrive mode, AROS detects the joystick’s center and
extreme positions and saves these values to balance the driving action. Accordingly,
rotate the joystick around its extreme limits and then let the joystick handle find its default
centered position before pressing the fire button and starting to joydrive the robot. Try
exiting (RESET or client command 47, depending on mode) and restarting joydrive mode
if the joystick doesn’t seem to function well.
The joystick’s fire button 1 acts as the joydrive “deadman”—press it to start driving;
release it to stop the robot’s motors. The robot should drive forward and reverse, and
turn left or right in response and at speeds relative to the joystick’s position.
When not connected with a client control program, releasing the joystick fire button
stops the robot. However when connected with a client, the client program resumes
automatic operation of your robot’s drive system. So, for example, your robot may
speed up or slow down and turn, depending on the actions of your client program.
You may adjust the maximum translational and rotational speeds and even disable
joydrive mode, through special AROS FLASH configuration parameters. See Chapter 7,
Updating & Reconfiguring AROS, for details.
13
The joystick adaptor kit, including the 15-pin DSUB joystick connector and pull-up resistors, if not installed on
your robot, is available for nominal fee through sales@activmedia.com
. Also note that this port is different
than the USB-based joystick port found on the back of the Laser bracket for the optional equipment and used
to manually drive from ARIA-based clients.
29