


ActivMedia Robotics
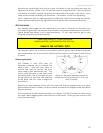
Remove the small plastic plug which is near the hinge on the top plate and near the
edge by the wheel. Under it, you will see the head of a large hex bolt. This bolt tightens
(clockwise) or loosens (counter-clockwise) the drive belt for that side of the robot. Turn it
using a 5mm hex key probably not more than 1 full rotation. Avoid over tightening.
Test to make sure that it is tight enough by holding the wheel while running the self test.
When adjusted satisfactorily, re-tighten the screws on the side and replace the plug.
GETTING INSIDE
We normally discourage you from opening up your robot. However, on occasion, you
may need to get inside, for instance to access the user power connections on the Motor-
Power board and attach your custom electronics. Or you may need to get to your
onboard computer and its accessories.
Open the robot AT YOUR OWN RISK,
unless explicitly authorized by the factory.
REMOVE THE BATTERIES FIRST!
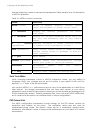
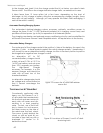
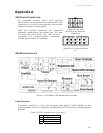
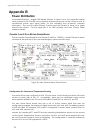
Figure 21. Remove indicated screws to
access front plate of Pioneer 2- and 3-DX
and -AT robots.
We describe here how to remove your robot’s nose to get at the onboard computer.
And we describe how to access the contents of the body of your Pioneer 3 and 2 DX or
AT robot.
Removing the Nose
The Pioneer 3- and 2-DX and –AT
onboard computer sits just behind the
robot’s nose. And you may have to
remove the nose to access the front
sonar array’s gain adjustment pot. Two
screws hold the nose to the front sonar
(or blank) array. The AT also has a screw
at the bottom of the nose that attaches
to the body; the DX’s nose is hinged at
the bottom.
Remove all nose retaining screws with the 3mm hex wrench supplied with your robot.
Unlike earlier Pioneer 2 models, you do not have to remove the Gripper or the front Bump
Ring accessories.
Once loosened, the DX nose pivots down on a hinge. For the AT model, four pins along
the nose’s back edges guide it onto the front of the robot. Simply pry the nose out and
away from the body.
63