


PROMISE Technology
Step 3: Attach mounting bracket
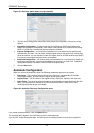
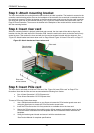
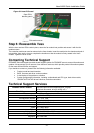
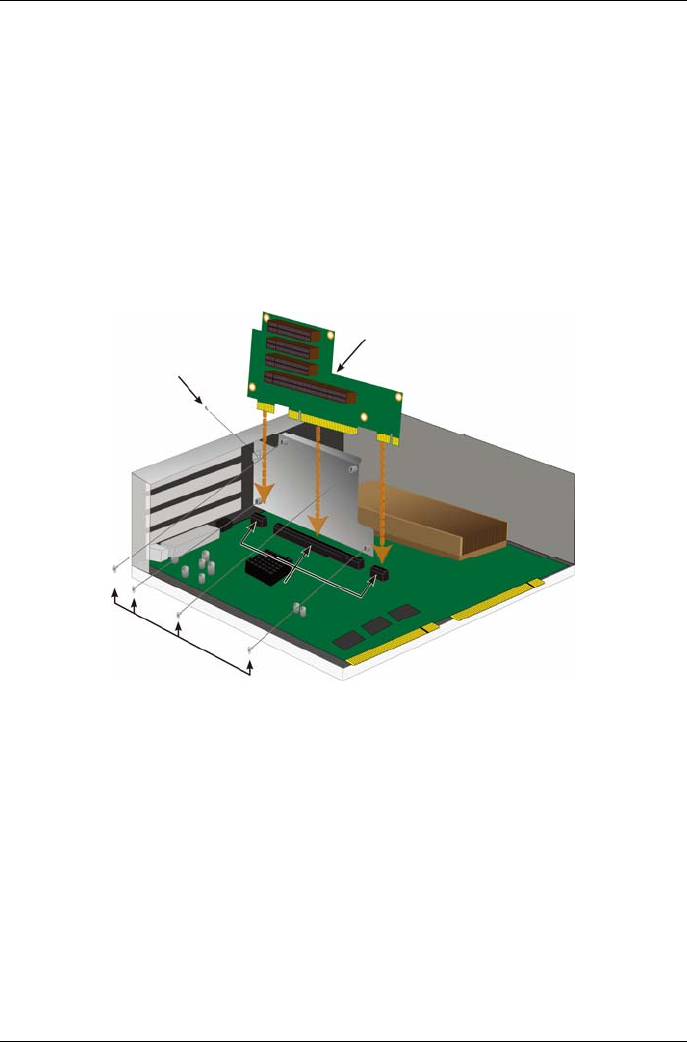
The riser card includes a mounting bracket used to anchor the card in position. The bracket is secured to the
controller module housing with a screw on the backplate of the controller, the screw hole is revealed when the
fan module is removed. Position the bracket so that the anchor posts used to mount the riser card in position
are facing the open side of the controller housing. See “Figure 33: Attach bracket and insert raiser card” on
Page 26 for an illustration. Then secure the bracket to the backplate of the module with the screw included
with the mounting bracket.
Step 4: Insert riser card
When the mounting bracket is properly positioned and secured, the riser card will be able to align to the
insertion into the riser card slots on the controller PCB. Insert the card into the slots so that the card is firmly
seated in place. Then anchor the riser card with the four anchor screws included with the shipment. See
“Figure 33: Attach bracket and insert raiser card” on Page 26 and “Figure 34: Insert PCIe card” on Page 27.
Figure 33: Attach bracket and insert raiser card
R
iser card
Riser bracket
anchor screw
Riser card slots
Riser card
anchor screws
Step 5: Insert PCIe card
The riser card is now ready to receive a PCIe card. See “Figure 34: Insert PCIe card” on Page 27 for
illustration. Note that the riser card can accommodate the following form factors:
One 16-lane Generation 2.0 PCI Express slot*
Three 8-lane Generation 2.0 PCI Express slots*
To insert a PCIe card, follow these steps:
1. Use a Phillips head screwdriver or your fingers to loosen the PCIe bracket guard screw and
swing the guard open to access the PCIe card anchor screw holes.
2. Insert the PCIe card so that it is firmly seated in an available slot on the riser card.
3. Secure the PCIe bracket to the module housing. When properly positioned the port(s) on the
PCIe card will be accessible from the backplate and the PCIe bracket will be flush with the
backplate.
4. Swing the bracket guard closed and secure it with the attached screw.
*See Product Manual for complete specifications
26