


Step 10: Setting up a USB Printer
17
Step 10: Setting up a USB Printer
You can use the SmartStor as a print server. You must connect the USB printer,
enable SmartStor’s print server, and set up printing on your PC.
• Connecting a USB Printer to SmartStor (page 17)
• Setting up the Print Server on SmartStor (page 17)
• Setting up Windows Printing (page 17)
• Setting up Linux Printing (page 18)
• Setting up Macintosh Printing (page 19)
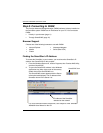
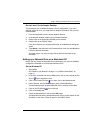
Connecting a USB Printer to SmartStor
To connect a USB printer:
1. Set up your printer according to the printer’s
Setup Guide
or
User Manual
.
2. Install the printer drivers onto your PC as described in the printer’s
Setup
Guide
or
User Manual
.
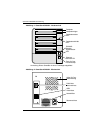
3. Attach the USB cable from your printer to one of the USB connections on the
back of the SmartStor. See Figure 2.
Setting up the Print Server on SmartStor
You must use PASM to configure the SmartStor for printing.
To set up the SmartStor’s print server:
1. Start PASM.
See “PASM in your Browser” on page 11 or “PASM in SmartSYNC” on
page 12.
2. In the Tree, on the left side of the PASM screen, click on the + beside the File
& Print icon to expand the Tree.
3. Click on the Protocol Control icon, then click on the Printer Server tab.
4. Click the Enable option button beside Printer Server.
5. Click the OK button to save your settings.
Setting up Windows Printing
To set up printing on a Windows PC:
1. On the Windows desktop, double-click on the My Network Places icon.
2. Click the Search button in the toolbar.
If the Search button is not shown, go to View > Toolbars and select
Standard
Buttons
.