


Step 2: Installing Disk Drives
5
Step 2: Installing Disk Drives
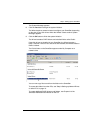
You can populate the SmartStor NS4300N with SATA 1.5 Gb/s or 3.0 Gb/s disk
drives. For optimal performance, install disk drives of the same model and
capacity. Your disk drives will become a RAID Volume on the SmartStor.
To install disk drives:
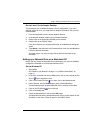
1. Open the door on the front of the SmartStor enclosure.
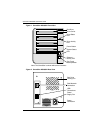
2. Pull a disk drive carrier from the enclosure. See Figure 1.
3. Carefully lay the disk drive into the drive carrier, so that the screw holes on
the sides of the carrier align with the screw holes in the drive.
4. Insert the screws through the holes in the drive carrier and into the sides of
the disk drive.
• Install only the counter-sink screws supplied with the SmartStor.
• Install four screws per disk drive.
• Snug each screw. Be careful not to over-tighten.
5. Reinstall the drive carrier into the SmartStor enclosure.
Repeat steps 2 through 5 until all of your disk drives are installed.
6. Close the door on the front of the SmartStor.
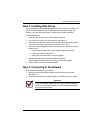
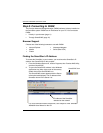
Step 3: Connecting to the Network
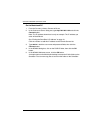
To connect the SmartStor to your network:
1. Attach one end of the network cable to the RJ45 network connection.
See Figure 2.
2. Attach the other end of the network cable to your Ethernet hub or switch.
Important
If there are multiple networks at your facility, note the network to
which you connect the SmartStor. You will need this information
during the setup process.