


SmartStor NS4300N Quick Start Guide
18
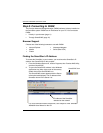
3. In the Computer name field, type the IP address of the SmartStor and click
the Search button.
See “Finding the SmartStor’s IP Address” on page 10.
The SmartStor appears in the search results list.
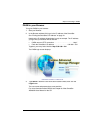
4. In the computer list, double-click on the SmartStor to open it.
If the Connect to dialog box appears, type admin in the both the user name
and password fields, then click the OK button.
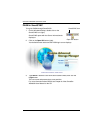
5. Right-click on the usbptr1 icon and choose
Connect...
from the dropdown
menu.
6. When the warning message about printer drivers appears, click OK to
continue.
7. In the Add Printer Wizard, click on the Manufacturer and model name of your
USB printer, then click OK.
8. In the Add Printer Wizard, click the OK button.
9. To verify printer installation, in the Windows Start menu, choose
Settings
,
then
Printers and Faxes
.
The Printers and Faxes screen appears. The usbptr1 is the USB printer on
the SmartStor.
Setting up Linux Printing
This procedure is for a RedHat Enterprise Linux 4 configuration. If you run a
different version of Linux, you might have to adapt the procedure. See your OS
documentation.
1. From the Applications menu, choose
System Settings
, then
Printing
.
Printer configuration window opens.
2. Click the New button.
Add a new print queue dialog box opens.
3. Click the Forward button.
4. In the Name field, type a name for the printer, such as
NAS_printer
, a
description, and click the Forward button.
5. From the Select a queue type dropdown menu, choose
Network Windows
(SMB)
.
6. Scroll the list and click on the triangle icon beside NS4300.
USBPTR01 appears below NS4300. USBPTR01 represents the USB printer
connected to the SmartStor.
7. Highlight
USBPTR01
and click the Forward button.
The Authentication dialog box opens.