


Getting Started
6
1
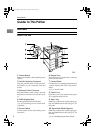
Guide to This Printer
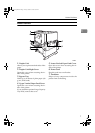
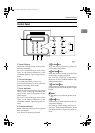
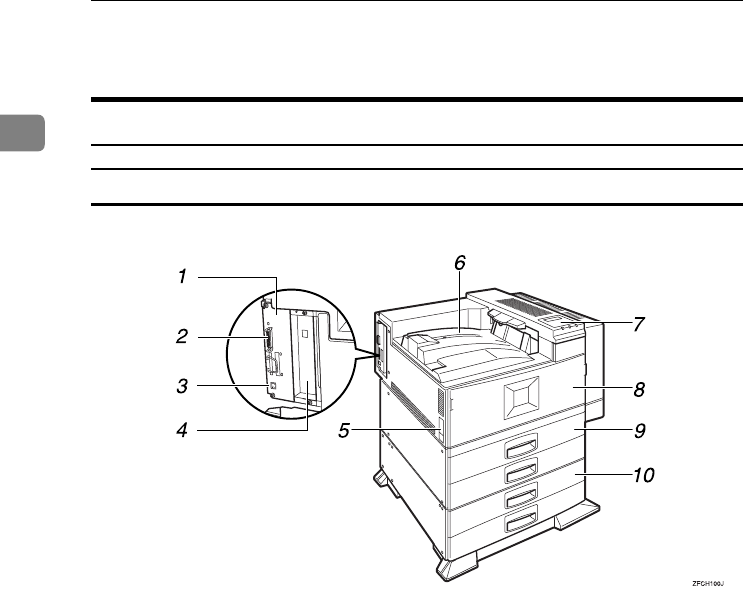
Mainframe
Exterior: Front View
1.
Printer Board
Remove this board when installing some
options.
2.
Parallel Interface Connector
Plug the parallel cable, which connects
the printer to your computer, into this
socket.
3.
Ethernet Cable Connector
Plug the Ethernet cable, which connects
the printer to the network, into this sock-
et.
4.
HDD (Option) Slot
Set the optional Printer Hard Disk.
⇒ p.18 “Installing Printer Hard Disk
Type4510”
5.
Power Switch
Use this switch to turn the printer power
on and off.
6.
Output Tray
Printed output is stacked here with the
print side face down.
7.
Control Panel
Contains keys for printing operation and
a panel display that shows the printer
status.
⇒ p.9 “Control Panel”
8.
Front Cover
Open this cover if you replace some parts
or if a paper misfeed occurs.
9.
Paper Tray
Holds up to 500 sheets of plain paper per
tray and 1000 sheets in total. (80 g/m
2
, 20
lb. bond)
10.
Paper Bank PS430 (Option)
Holds up to 500 sheets of plain paper per
tray and 1000 sheets in total. (80 g/m
2
, 20
lb. bond)
⇒ p.15 “Installing Paper Bank PS430”
Setup-F3_FM.book Page 6 Friday, October 5, 2001 8:27 PM