


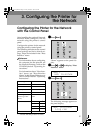


Configuring the Printer for the Network with the Control Panel
33
3
H
HH
H
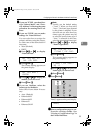
If you use TCP/IP, you should as-
sign “Subnet Mask” and “Gate-
way Address” following the same
procedure for entering the IP ad-
dress.
I
II
I
If you use TCP/IP, you can make
settings for “Network Boot”.
You can select how to assign the
printer's address using the compu-
ter. Select one of the items below if
necessary.
• None (Default)
• DHCP
A Press {
{{
{U
UU
U}
}}
} or {
{{
{T
TT
T}
}}
} to display
“Network Boot”.
B Press {
{{
{Enter #}
}}
}.
The current setting appears on
the panel display.
C Press {
{{
{U
UU
U}
}}
} or {
{{
{T
TT
T}
}}
} to display the
method you want to use.
D Press {
{{
{Enter #}
}}
}.
J
JJ
J
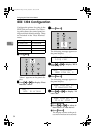
If you use NetWare, select the
frame type for NetWare.
Select one of items below if neces-
sary.
• Auto (Default)
• Ethernet 802.3
• Ethernet 802.2
• Ethernet II
• Ethernet SNAP
Note
❒
Usually, use the default setting
(“Auto ”). When you first select
“Auto ”, the frame type detected
by the printer is adopted. If your
network can use more than two
frame types, the printer may fail
to select the correct frame type if
“Auto ” is selected. In this case,
select the appropriate frame type.
A Press {
{{
{U
UU
U}
}}
} or {
{{
{T
TT
T}
}}
} to display
“Frame Type (NW)”.
B Press {
{{
{Enter #}
}}
}.
The current setting appears on
the panel display.
C Press {
{{
{U
UU
U}
}}
} or {
{{
{T
TT
T}
}}
} to display the
frame type you want to use.
D Press {
{{
{Enter #}
}}
}.
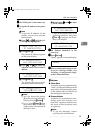
K
KK
K
Press {
{{
{On Line}
}}
}.
"Ready" appears on the panel display.
L
LL
L
Print a configuration page to con-
firm the settings made. See
"Printing a Configuration Page" in
the Printer Reference.
Network Setup:
Network Boot
Network Boot:
*None
Network Setup:
Frame Type (NW)
Frame Type (NW):
*Auto
Ready
Setup-F3_FM.book Page 33 Friday, October 5, 2001 8:27 PM