


54
4 User's Reference
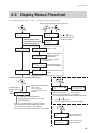
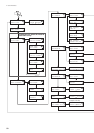
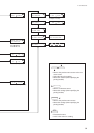
Description of Menus
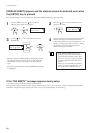
Pressing the [MENU] key enters the menu mode.
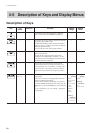
Default
value
Setting
range
FunctionSubmenu
Top
menu
SHEET
TYPE
— OPAQUE
CLEAR
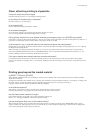
OPAQUEThis is used to select either transparent or opaque material.
Select [OPAQUE] when the material loaded on the unit is not transpar-
ent. When using transparent material or when the printing area cannot
be detected, select [CLEAR].
For more information, see "4-6 What to Do If... -- [INVALID SHEET]
appears and the material cannot be detected even when the [SETUP]
key is pressed."
DEMO
PRINT
— ——This prints a sample image.
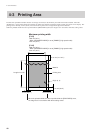
PRINT
AREA
MOVE TO
R-EDGE
SET R-EDGE
MOVE TO
L-EDGE
SET L-EDGE
EXIT
——
* This appears only when the material is in a loaded state.
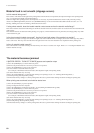
This sets the printing area in the left-right direction (the direction of
carriage movement) of the loaded material.
With transparent material, automatic detection of the material width is
not performed. In such cases, use the [PRINT AREA] menu to specify
the printing area in the left-right direction. Even when using opaque
material, this can be used to specify a specific area for performing
printing.
Pressing the [ENTER] key while [MOVE TO R-EDGE] or [MOVE TO
L-EDGE] is displayed moves the carriage to the currently set right- or
left-hand edge of the material.
When setting a new printing area, make the setting with [SET R-
EDGE] or [SET L-EDGE].
For more information, see "2-6 Printing -- Setting the Printing Area."
Press [EXIT] to quit this menu.
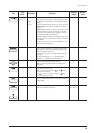
HEAD
CLEANING
TEST
PRINT
NORMAL
POWERFUL
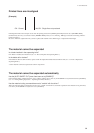
——Before starting to print, you can carry out a printing test to check the
printing quality.
If the printing test shows a problem, clean the printing head.
Because cleaning subjects the head to wear and consumes ink, it should
only be performed when absolutely necessary. Performing cleaning
from the [POWERFUL] menu in particular subjects the head to early
wear and used up large amounts of ink.
[TEST PRINT]: Performs a printing test within an area of approxi-
mately 54 mm (2-3/16 in.) by 18 mm (6/8 in.). If a problem is found,
then continue by carrying out cleaning.
[NORMAL]: Performs cleaning of the printing heads. After cleaning,
carry out a printing test to make sure there are no problems with
printing quality.
You should usually choose [NORMAL]. ([CLEANING] does the
same thing as [HEAD CLEANING] - [START] displayed when the
[CLEANING] key is pressed.)
[POWERFUL]: Used when performing cleaning with [NORMAL]
several times does not restore the printing quality. After cleaning,
carry out a printing test to make sure there are no problems with
printing quality.
For more information, see "2-5 Test Printing" and "3-3 Cleaning the
Printing Heads."