


63
4 User's Reference
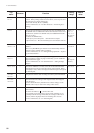
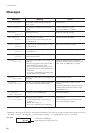
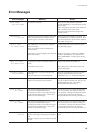
Error Messages
Meaning
A motor error occurred.
The air temperature where installed is lower than
the ambient temperature at which the unit can
operate (approx. 5°C (41°F) or more lower).
The [SETUP] key was pressed even though no
material is loaded.
Setup was performed with no material at the
correct location.
[Sheet Type] is set to [OPAQUE], but transparent
material was loaded.
An attempt was made to load material that is too
small.
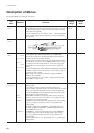
The reflective tape is dirty.
The [SETUP] key was pressed with the pinch
rollers up.
The pinch rollers were raised during setup.
An attempt was made to set the print-start
location at a position beyond the material.
The setting for the right-hand edge was not made
correctly at the [PRINT AREA] menu.
An attempt was made to set the right-hand edge
to the left of the left-hand edge, or at the same
location as the left-hand edge.
The setting for the left-hand edge was not made
correctly at the [PRINT AREA] menu.
An attempt was made to set the left-hand edge to
the right of the right-hand edge, or at the same
location as the right-hand edge.
The printing head was returned to its standby
position to be capped, canceling current printing
job.
Because emergency stop was effected more than
10 min.
Action
Recovery from this problem is impossible.
Use the POWER key to switch the power off and
back on again.
After rectifying the cause of the error (a material
jam or the like), switch on the power.
Do not leave the unit with the carriage not in
standby position.
Recovery from this problem is impossible. Use
the [POWER] key to switch the power off. First
raise the temperature of the area where installed,
then switch on the power.
Load material at the correct location and press
the [SETUP] key again.
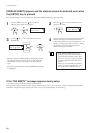
When using transparent material, set [SHEET
TYPE] to [CLEAR] (see "4-6 What to Do If...
(If the "INK EMPTY" message appears during
setup)").
Replace with material of loadable size.
Wipe off the grime on the reflective tape, then
perform setup again.
Move the sheet loading levers toward "LOAD"
and lower the pinch rollers, then press the
[SETUP] key (see "2-4 Loading the Material").
Use the arrow keys to move the carriage marker
to a place within the printing area, then press the
[BASE POINT] key (see "2-6 Printing --
Printing at the Desired Location").
Use the arrow keys to move the carriage marker
to a correct position, then make the setting (see
"2-6 Printing -- Printing at the Desired Location
-- Setting the printing area in the left-right
direction (the direction of carriage movement)").
Use the arrow keys to move the carriage marker
to a correct position, then make the setting (see
"2-6 Printing -- Printing at the Desired Location
-- Setting the printing area in the left-right
direction (the direction of carriage movement)").
Turn power off by pressing [POWER] key to
reset.
Error messages
MOTOR ERROR
TURN OFF POWER
TEMPERATURE
IS TOO LOW
INVALID SHEET
SET SHEET AGAIN
SHEET TOO SMALL
SET SHEET AGAIN
PINCHROLL ERROR
DOWN PINCHROLL
BASE POINT ERROR
PRINT R-EDGE
SET ERROR
PRINT L-EDGE
SET ERROR
HEAD DRY-UP
WARNING