


14 ULTRAVIEW REMOTE 2 INSTALLATION AND OPERATIONS MANUAL
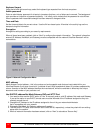
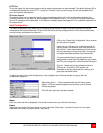
(Following describes each of the Configuration Tabs.
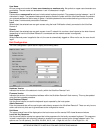
User Accounts
Allows you to create and manage up to sixteen separate user accounts, each with
separate access permissions. Account #1 is the admin account. Enter User name,
password. Tick/un-tick the Local and Remote options that are appropriate to the user.
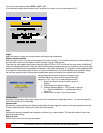
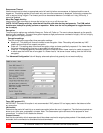
Unit Configuration
Allows you to modify unit settings within the UltraView Remote 2. You can define the
keyboard, set-up the admin account, assign a name to the unit, screensaver time and
encryption options
Time & Date
Configuration
Set the time and date, this time stamps the log files
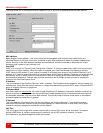
Network Configuration
Configures the network IP, network mask, gateway, VNC port, HTTP port. You can
alter any of the existing network settings plus you can set-up the IP access control
feature that lets you specifically include or exclude certain addresses or networks
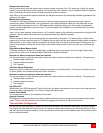
Host Configuration
Allows configuration of various details for each host system connected to UltraView
Remote 2. 128 entries max, Add host names, Users, Hotkey, and power control
sequence.
Logging and Status
Provides various details about the UltraView Remote 2 activity
LDAP Configuration
Configures unit for LDAP
Return to Host
Exit the configuration menu system and return to the host computer
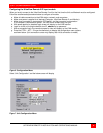
Following is an explanation and examples of each of the configuration items:
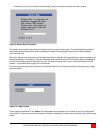
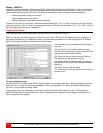
User Accounts
Selecting user accounts will display the following menu.
The first of the sixteen accounts is the admin account and is the only account with access rights to the configuration
menus. The user name and access rights are fixed for the admin account. The only change possible for this account
is the password.
There are fifteen user account positions.
To create a new account
1 Enter the required User Name to activate that position (the Password and access tick box positions will
become editable).
2 Optionally enter a password for the user account.
3 Tick/un-tick the Local, Remote, and Auto Logon options that are appropriate to the user.
4 Click the Save button to register your changes.