


ULTRAVIEW REMOTE 2 INSTALLATION AND OPERATIONS MANUAL
43
Ignoring the initial three octets, the final six zeroes of the mask would ensure that the 32 addresses from .64
(01000000) to .95 (01011111) would all be treated in the same manner. See Net masks - the binary explanation for
details.
When defining a mask, the important rule to remember is:
There must be no ‘ones’ to the right of a ‘zero’.
For instance, (ignoring the first three octets) you could not use a mask that had 11100110 because this would affect
intermittent addresses within a range in an impractical manner. The same rule applies across the octets. For
example, if you have zeroes in the third octet, then all of the fourth octet must be zeroes.
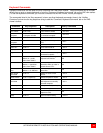
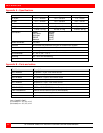
The permissible mask values (for all octets) are as follows:
Mask octet Binary Number of addresses encompassed
255 11111111 1 address
254 11111110 2 addresses
252 11111100 4 addresses
248 11111000 8 addresses
240 11110000 16 addresses
224 11100000 32 addresses
192 11000000 64 addresses
128 10000000 128 addresses
0 00000000 256 addresses
If the access control range that you need to define is not possible using one address and one mask, then you could
break it down into two or more entries. Each of these entries could then use smaller ranges (of differing sizes) that,
when combined with the other entries, cover the range that you require.
For instance, to accurately encompass the range in the earlier example:
192.168.142.67 to 192.168.142.93
You would need to define the following six address / mask combinations in the IP access control section:
Network/address entry Mask entry
192.168.142.67 255.255.255.255 defines 1 address (.67)
192.168.142.68 255.255.255.252 defines 4 addresses (.68 to .71)
192.168.142.72 255.255.255.248 defines 8 addresses (.72 to .79)
192.168.142.80 255.255.255.248 defines 8 addresses (.80 to .87)
192.168.142.88 255.255.255.252 defines 4 addresses (.88 to .92)
192.168.142.93 255.255.255.255 defines 1 address (.93)
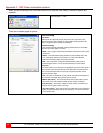
Mask
Enter an IP network mask that indicates the range of addresses that will be allowed or denied access. For instance, if
only a single specified IP address were required, the mask entry would be 255.255.255.255 in order to specify a
single location.
Access
Use the arrow buttons to select either ‘Allow’ or ‘Deny’ as appropriate.
1 Enter the base network address, the mask and select the appropriate access setting.
2 Click the OK button.
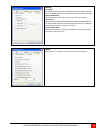
To reorder access control entries
IMPORTANT: When reordering, ensure that any specific allowed addresses are listed higher in the list than any
denied addresses. Take care not to invoke any deny access settings that would exclude valid users.
1 In the access control list, click on the entry to be moved.
2 Click the Up or Down buttons as appropriate.
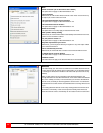
To edit/remove access control entries
1 In the access control list, click on the appropriate entry.
2 Click either the Edit or Remove button as appropriate.