


32 ULTRAVIEW REMOTE 2 INSTALLATION AND OPERATIONS MANUAL
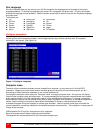
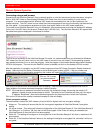
Mouse Control
This option displays a mouse control dialog box and is useful when the remote cursor is failing to respond correctly to
your mouse movements, even after using the Re-sync and calibration mouse option.
The mouse control dialog allows you to control the remote mouse cursor manually using a selection of buttons that
you click with your local mouse. Additional options also allow you to restore the settings of a mouse that has failed to
operate correctly.
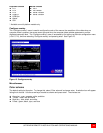
Keyboard Control
This option displays a keyboard control dialog and is useful for sending keyboard combinations (to the host) that are
needed regularly.
When entering codes:
+ means press down the key that follows
– means release the key that follows
+– means press down and release the key that follows
* means wait 250ms (note: if a number immediately foll
ows the asterisk, then the delay will equal the number, in
milliseconds - *300 = 300 ms wait)
It is automatically assumed that all keys specified will be released at the end, so there is no need to specify -Ctrl or -
Alt if these keys are to be released together.
See Appendix 7 for a list of key sequence codes that can be used.
Examples:
‘Ctrl + F12’ to invoke the KVM switch module’s OSD would be expressed as: +-Ctrl+-F12
‘Ctrl + Esc’ to invoke the KVM switch module’s CPU port selection window would be expressed as: +-Ctrl+-Esc
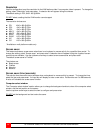
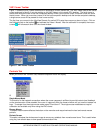
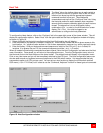
Video Settings
This dialog provides access to all of the key video settings that determine image quality and link performance.
Using automatic configurations
• Every setting can be individually subjected to an automatic configuration (click the appropriate ‘Auto’ button) and
most can also be manually adjusted.
• Use the Calibrate All button to automatically determine the optimum settings for all items.
Note: Before using the ‘Calibrate All’ option, if possible, remove on-screen display (OSD) elements generated
by any connected KVM switches (such as a host name label or menu). These OSD elements use
different video rates to those of the host system(s) and can affect the setting of the automatic threshold
value. UltraView Remote-2 uses an improved calculation procedure to filter out the effect of these
elements. However, best results are obtained when the screen contains only host system information.
Note: To maximize performance, the threshold level is automatically increased by 50% when a slow link is
detected.
Note: If the UltraView Remote-2 is used with one or more KVM switches, the threshold needs to be higher
than 32 due to the significant amounts of ‘noise’ that these switches introduce. The UltraView Remote-2
configuration should detect such noise and adjust the threshold accordingly.
Setting the Threshold manually
Occasionally it can be useful to manually adjust the Threshold setting, in order to achieve a setting that best suits
your particular requirements.
1 Use the ‘Calibrate All’ function to ensure that all other settings are optimized.
2 Click the Threshold left arrow button to decrement the setting by one and observe the ‘Display Activity’
indicator.
3 Repeat step 2 until the Display Activity indicator suddenly rises to a much higher level (i.e. 50%). This will
mean that you have reached the noise boundary. At this point, increment the Threshold value by 2 or 3 points
to achieve an optimum setting.
Virtual Media
The Remote Virtual Media feature is not implemented on this model
Info
When selected, this option displays an information dialog showing the current logged on users, the current host, its
video mode and its mouse motion details.