


Section 2. Installation
Page 2-8 PN 9001105 Rev. A SATO M-84PRO
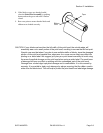
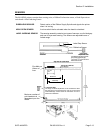
LOADING THE RIBBON
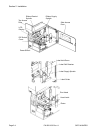
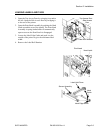
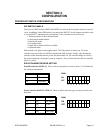
1. Open the Top Access Door by swinging it
up and to the left and the Side Access Door
by swinging it toward the rear of the
printer.
2. Open the Print Head by rotating the Head
Latch toward the rear of the printer. The
Print Head is spring-loaded and will
automatically open as soon as the Head
Latch is disengaged.
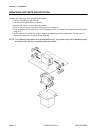
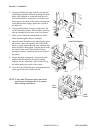
3. Locate the extra ribbon core supplied with
the printer. Place the core on the Ribbon
Rewind Spindle, pushing it all the way to
the inside of the spindle. Note that the new
empty core of each subsequent roll becomes
the next rewind core.
4. Load the ribbon onto the Ribbon Supply Spindle, also pushing it all the way to the inside of the
spindle. The dull side of the ribbon should be facing down as it travels through the Print Head
Assembly.
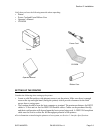
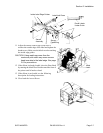
5. Feed the leader portion of the ribbon through the Print Head Assembly and up to the Ribbon Rewind
Spindle following the routing shown in the diagram.
6. Load the ribbon behind and over the top of the Ribbon Rewind Spindle and tape it to the Extra Ribbon
Core. Make sure it matches the ribbon path shown in the diagram.
7. Manually turn the Rewind Spindle to wrap the ribbon onto the core one to two turns to secure it.
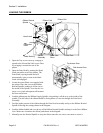
Ribbon Roll
Ribbon Path
Ribbon Rewind
Spindle
Head Latch
Dispensed
Label
Label Backing
Sensor
Assembly
Label Hold
Down
Label Path
Top Access Door
Side Access Door