


Section 7. Optional Accessories
Page 7-2 PN 9001105 Rev. A SATO M-84PRO
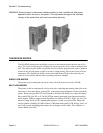
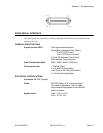
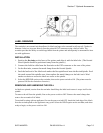
PLUG-IN INTERFACE MODULES
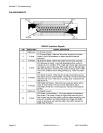
The Series “e” and PRO printers have user changable Plug-In Interface Modules. The Interface Module is
accessible from the Rear Panel and is retained by two screws. Use the following procedure to replace an
interface molule.
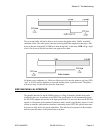
1. Turn power off both the printer and the host and remove the power and interface cables.
WARNING: Never connect or disconnect interface cables (or use a switch box) with power
applied to either the host or the printer. This may cause damage to the interface
circuitry and is not covered by warranty.
2. Remove the two Interface Module Retaining Screws.
3. Grasp the Interface Module and pull it out of the connector.
4. Place the new Interface Module in the slot and press inward firmly until it is properly seated.
5. Replace the two Interface Card Retaining Screws.
6. If the new Interface Module is for a serial interface, set DSW1 for the proper operation.
7. Connect the interface cable to the connector
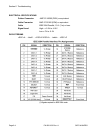
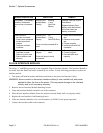
ERROR DESCRIPTION INDICATION REMEDY
Low Battery - Low battery
condition is detected
when printer is powered
on.
ERROR LED:
Audible Beep:
Display:
Blinking
1 long
Card Low
Battery
Depress LINE key to print
Card Status.
Replace Memory Card
battery. Note that all data
will be lost when the
battery is removed.
Card R/W Error
1 No card is inserted.
2 Card is write protected.
3 Invalid store/recall
number.
4 Card has not been
initialized.
ERROR LED:
Audible Beep:
Display:
On
1 long
Card R/W Error
1 Insert card into selected
slot.
2 Remove write protect
tab.
3 Correct program
4 Initialize card with BJF
command.
Printer must be powered off to
reset.
Warning
1 Duplicate number.
2 Data not in print area.
3 Data overflows card
memory.
Audible Beep:
Display:
1 short
None
1 Correct program.
2 Correct program.
3 Use card with more
capacity.
Printer will ignore invalid
commands.