


3-33
CHAPTER3
3
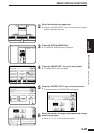
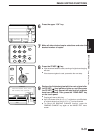
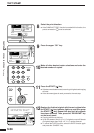
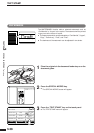
Press the “TEXT STAMP” key on the touch panel.
●
The TEXT STAMP menu will appear.
4
Press the “DATE” key on the touch panel.
●
The setting screen for DATE will appear.
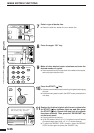
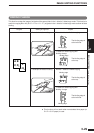
5
Select the desired date format on the touch panel.
●
The selected format will be highlighted.
●
The date formats displayed on the touch panel may be different
from the illustration above depending on the country or region.
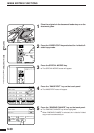
6
Select the pages to be stamped.
●
Indicate whether the date is to be printed only on the first page
or on all pages, by pressing the “1ST PAGE ONLY” or “ALL
PAGES” key.
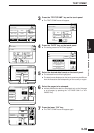
7
Press the lower “OK” key.
●
The TEXT STAMP menu will appear again.
PECIAL MODES
EXT STAMP
DATE
SELECT
STAMP
PRINT
DIRECTION
PAGE
NUMBER
WATERMARK
OK
OK
23 March, 2000
March 23, 2000
23/03/00
03/23/00
DATE
1ST
ONL
ALL
CANCEL
March, 2000
ch 23, 2000
23/03/00
03/23/00
1ST PAGE
ONLY
ALL PAGES
CANCEL
OK
1ST PAGE
ONLY
CANCEL
OK
OK
READY TO COPY.
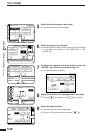
SPECIAL MODES
MARGIN SHIFT
MULTI SHOT
PAMPHLET COPY
ERASE
COVERS
IMAGE EDIT
TEXT STAMP
TRANSPARENCY
INSERTS
DUAL PAGE
COPY
OK
AUTO
EXPOSURE PAPER SELECT
100%
COPY RATIO
AUTO
A4
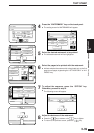
SPECIAL FUNCTIONS Text stamp
TEXT STAMP
READY TO COPY.
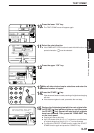
SPECIAL MODES
TEXT STAMP
DATE
SELECT
STAMP
PRINT
DIRECTION
PAGE
NUMBER
WATERMARK
OK
OK
READY TO COPY.
23 March, 2000
March 23, 2000
23/03/00
03/23/00
DATE
1ST PAGE
ONLY
ALL PAGES
CANCEL
OK
OK