


1-4
VPL-CS2/CX1
GB
6
Precautions
B
Overview
Precautions
On safety
• Check that the operating voltage of your
unit is identical with the voltage of your
local power supply.
• Should any liquid or solid object fall into
the cabinet, unplug the unit and have it
checked by qualified personnel before
operating it further.
• Unplug the unit from the wall outlet if it is
not to be used for several days.
• To disconnect the cord, pull it out by the
plug. Never pull the cord itself.
• The wall outlet should be near the unit and
easily accessible.
• The unit is not disconnected to the AC
power source (mains) as long as it is
connected to the wall outlet, even if the
unit itself has been turned off.
• Do not look into the lens while the lamp is
on.
• Do not place your hand or objects near the
ventilation holes. The air coming out is
hot.
• Be careful not to catch your fingers by the
adjuster when you lift up the projector. Do
not push hard on the top of the projector
with the adjuster out.
On illumination
• To obtain the best picture, the front of the
screen should not be exposed to direct
lighting or sunlight.
• Ceiling-mounted spot lighting is
recommended. Use a cover over
fluorescent lamps to avoid lowering the
contrast ratio.
• Cover any windows that face the screen
with opaque draperies.
• It is desirable to install the projector in a
room where floor and walls are not of
light-reflecting material. If the floor and
walls are of reflecting material, it is
recommended that the carpet and wall
paper be changed to a dark color.
On preventing internal heat build-
up
After you turn off the power with the I / 1
key, do not disconnect the unit from the wall
outlet while the cooling fan is still running.
Caution
The projector is equipped with ventilation
holes (intake) and ventilation holes
(exhaust). Do not block or place anything
near these holes, or internal heat build-up
may occur, causing picture degradation or
damage to the projector.
On cleaning
• To keep the cabinet looking new,
periodically clean it with a soft cloth.
Stubborn stains may be removed with a
cloth lightly dampened with a mild
detergent solution. Never use strong
solvents, such as thinner, benzene, or
abrasive cleansers, since these will
damage the cabinet.
• Avoid touching the lens. To remove dust
on the lens, use a soft dry cloth. Do not use
a damp cloth, detergent solution, or
thinner.
• Clean the filter at regular intervals.
On repacking
• Save the original shipping carton and
packing material; they will come in handy
if you ever have to ship your unit. For
maximum protection, repack your unit as
it was originally packed at the factory.
On LCD projector
• The LCD projector is manufactured using
high-precision technology. You may,
however, see tiny black points and/or
bright points (red, blue, or green) that
continuously appear on the LCD projector.
This is a normal result of the
manufacturing process and does not
indicate a malfunction.
7
GB
Features
Overview
Features
High portability
• Light weight/small size
This projector has been miniaturized to
approx. 2.9 kg (6 lb 6 oz) in weight and
B5-file size through the adoption of a
retractable mechanism. A carrying handle
is equipped with the projector, so you can
carry it easily with your computer.
Reduced noise
Because the projector uses Sony’s unique
cooling mechanism, noise has been reduced.
High brightness, high picture
quality
• High brightness
Adopting the high-efficiency optical
system and the 120 W UHP lamp allows
high brightness (VPL-CS2: light output
600 ANSI lumen, VPL-CX1: light output
550 ANSI lumen) and excellent
uniformity on the picture.
•High resolution
VPL-CS2:
Three 0.7-inch, about 480,000 pixel,
SVGA panels provide a resolution of 800
× 600 dots for RGB input and 600
horizontal TV lines for video input.
VPL-CX1:
Three 0.7-inch, about 790,000 pixel, XGA
panels provide a resolution of 1024 × 768
dots for RGB input and 750 horizontal TV
lines for video input.
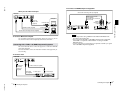
Simple setup
• Simple setup with external equipment
This projector is preset for 37 kinds of
input signals. You can project images from
an external signal source just by
connecting the equipment with the
supplied cable and pushing the APA key.
• Compatible with USB (Universal Serial
Bus) hub function
You can connect an USB equipment (e.g.,
USB mouse) to the projector, and also
control the projector by using the
application software (CD-ROM) supplied
with the projector from a computer
operated with Windows 98, Windows 98
SE or Windows 2000. Using this
application software, you can open a file
you want to use for your presentation with
the supplied Remote Commander.
Easy presentation
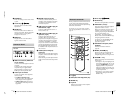
• Multi function Remote Commander
with mouse control functions
You can operate a computer connected to
this projector with the Remote
Commander since the unit has a build-in
mouse receiver.
• Digital ZOOM and FUNCTION keys
on the Remote Commander
The Digital ZOOM allows you to enhance
your presentation by zooming in on the
image.
You can allocate a presentation file to the
FUNCTION keys by using the application
software (CD-ROM) supplied with the
projector. Just pressing the FUNCTION
key opens the file immediately.
Accepts various input signals
• Scan converter loaded
This projector has a build-in scan
converter that converts the input signal
within 800 × 600 dots (VPL-CS2) or 1024
× 768 dots (VPL-CX1).
• Compatible input signals
This projector accepts video signals of
composite, S video, and component as
well as VGA, SVGA, XGA, and SXGA
signals, which all can be displayed.
• Compatible with six color systems
NTSC, PAL, SECAM, NTSC
4.43
1)
, PAL-
M, or PAL-N color system can be selected
automatically or manually.
1)NTSC
4.43
is the color system used when
playing back a video recorded on NTSC
on a NTSC
4.43
system VCR.