


1-7
VPL-CS2/CX1
GB
12
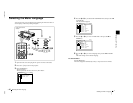
Location and Function of Controls
6 ENTER key
Enters the settings of items in the menu
system.
7 Arrow keys (M
MM
M/m
mm
m/<
<<
</,
,,
,)
Select the menu or to make various
adjustments.
8 RESET key
Resets the value of an item back to its
factory preset value. This key functions
when the menu or a setting item is
displayed on the screen.
9 MENU key
Displays the on-screen menu. Press
again to clear the menu.
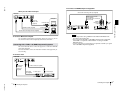
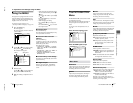
1 INPUT A connector (HD D-sub
15-pin, female)
Connect to external equipment such as a
computer.
Connects to the monitor output on a
computer using the supplied cable.
When inputting a component or 15k
RGB signal, use an optional cable.
2 Video input connector
Connect to external video equipment
such as a VCR.
• S VIDEO (mini DIN 4-pin):
Connects to the S video output (Y/C
video output) of video equipment.
• VIDEO (phono type): Connects to
the composite video output of video
equipment.
3 MOUSE connector (6-pin)
Connects to the PS/2 mouse port on a
computer via the supplied mouse cable,
to control the mouse function of the
connected computer.
4 USB connector (USB A-plug for
downstream, 4-pin)
Connect to USB equipment such as a
mouse, camera, etc.
5 USB connector (USB B-plug for
upstream, 4-pin)
Connect to the USB connector on a
computer. When you connect the
projector to the computer, the projector
recognizes the mouse of the computer
connected to the INPUT A connector
and you can control the mouse function
with the supplied Remote Commander.
The supplied application software can
be installed in the computer attached to
this connector.
6 AUDIO (stereo minijack)
connector
When listening to sound output from the
computer, connect to the audio output of
the computer.
When listening to sound output from the
VCR, connect to the audio output of the
VCR.
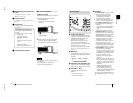
Connector Panel
INPUT A
S VIDEO
VIDEOMOUSE
AUDIO
Rear side
13
GB
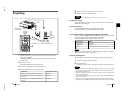
Location and Function of Controls
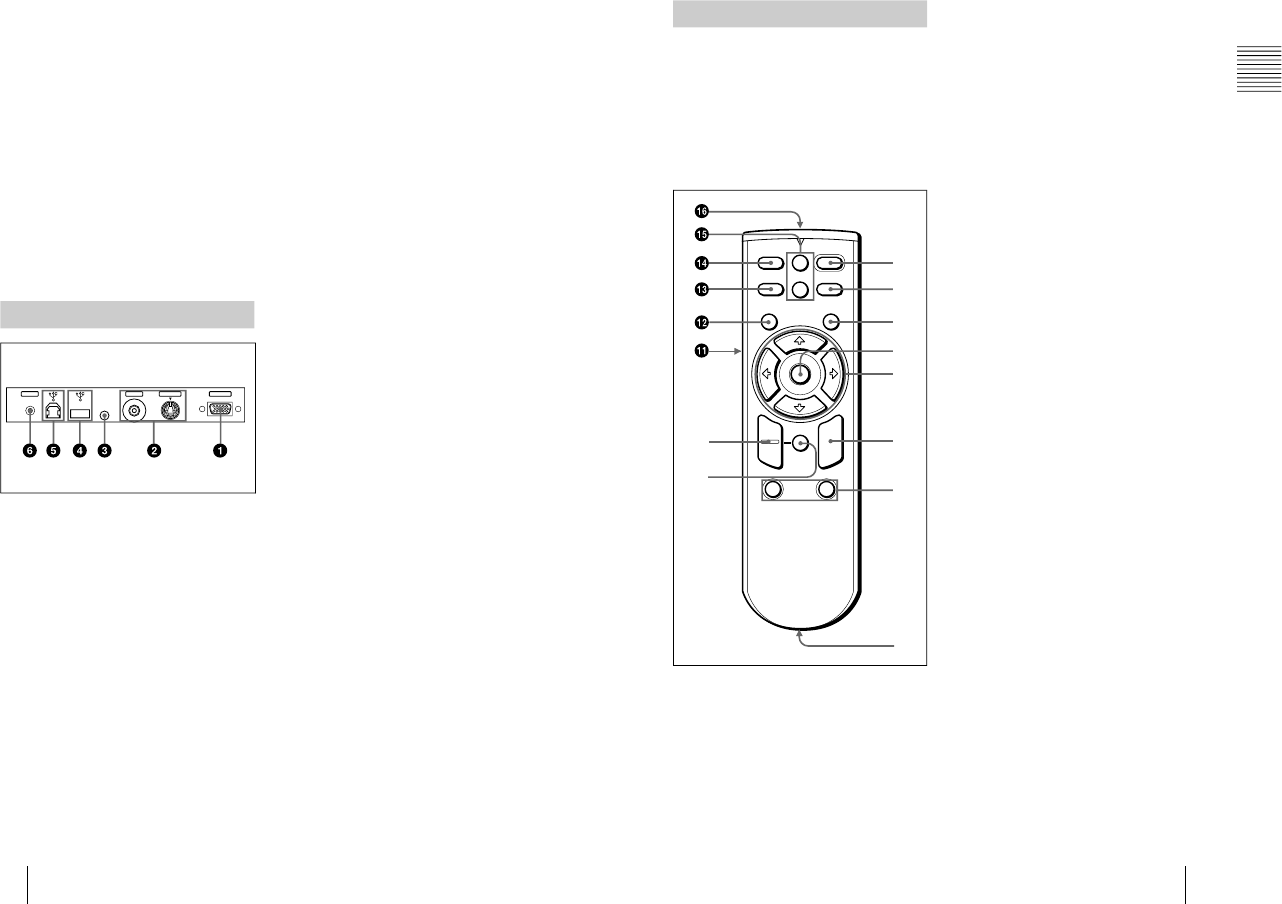
Overview
The keys that have the same names as those
on the control panel function identically.
You can control a connected computer using
the Remote Commander.
For details, see “To control the computer
using the supplied Remote Commander” on
page 23.
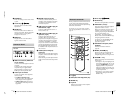
1 I / 1
11
1 key
2 APA (Auto Pixel Alignment) key
3 ENTER key
4 Joystick
Functions as the mouse of the computer
connected to the unit.
5 Arrow keys (M
MM
M/m
mm
m/<
<<
</,
,,
,)
6 R CLICK key
Functions as the right button on a mouse.
7 FUNCTION 1, 2 keys
These keys function when the supplied
application software is used.
When you connect the projector with a
computer, you can open a file on the
screen by just pressing the FUNCTION
key. This will enhance your
presentation. To use this function,
allocate a file to the FUNCTION key by
using the application software.
For details, see the README file and
the HELP file supplied with the
application software.
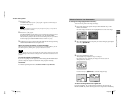
8 CONTROL S OUT jack (stereo
minijack)
This does not function with this
projector.
9 RESET (D ZOOM) key
Resets the value of an item back to its
factory preset value or returns the
enlarged image back to its original size.
0 D ZOOM +/
–
key
Enlarges the image at a desired location
on the screen.
+: Pressing the + key once highlights one
of the images divided into 16. Use an
arrow key (M/m/</,) to move the
highlight portion to the point in the
image to be enlarged. Press the + key
repeatedly until the image is enlarged
to your requirements.
–
:Pressing the
–
key reduces an image
that has been enlarged with the D
ZOOM + key.
Remote Commander
I / 1
PIC
INPUT
MUTING
MENU ENTER
VOLUME
RESET
FUNCTION
D ZOOM
12
(D ZOOM)
APA
+
–
+
–
R
CLICK
0
9
2
3
4
5
6
1
7
8