


24
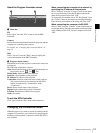
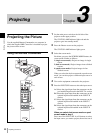
Projecting the Picture
Chapter 3 Projecting
The POWER and STATUS LAMP indicators light red
and the projector goes into standby mode.
2
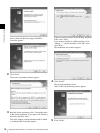
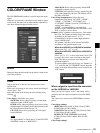
Start your computer and double-click the icon of
the SRX Controller in the desktop window.
The Program Launcher screen appears.
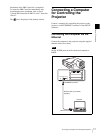
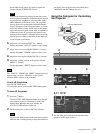
3
Select the projector you want to operate by double-
clicking the projector.
The T100 Controller starts and the Control Function
Menu window appears.
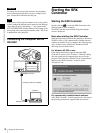
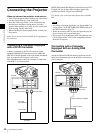
When you connect the projectors to the computer via a
network, you can also select the projector you want to
operate by specifying the IP address of the projector. If
connection is made via the RS232C connector on the
projector, specify the RS-232C port number of the
computer.
For details, see “Changing the Connection Mode” on
page 19.
4
Click the “POWER ON ?” button to turn on the
projector.
The POWER and STATUS LAMP indicators light
green.
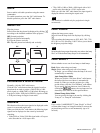
5
Click one of the following buttons to select the screen
mode.
(single-screen mode): Projects images in single
screen.
(dual-screen mode): Projects images in two
divided screens.
(quad-screen mode): Projects images in four
divided screens.
When you select the dual-screen mode or quad-screen
mode, you can also project a different input source in
each screen.
6
Turn on the equipment connected to the projector.
7
Select the input source from the drop-down list box
displayed by clicking .
INPUT A: Selects the signal input from the
connectors on the pre-installed input board in the
INPUT A section.
INPUT B: Selects the signal input from the
connectors on the optional input board installed in
the INPUT B section.
INPUT C: Selects the signal input from the
connectors on the optional input board installed in
the INPUT C section.
INPUT D: Selects the signal input from the
connectors on the optional input board installed in
the INPUT D section.
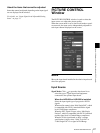
When you select the input from the connectors on the
LKRI-001, LKRI-003, LKRI-004, LKRI-005 input
board, select the appropriate input signal from “Signal
Mode” of “Input Source” in the PICTURE CONTROL
window. Improper setting may cause deterioration of
the picture.
For details, see page 27.
When you select dual-screen mode or quad-
screen mode in step 5
Select the input source for each screen from the
corresponding drop-down list box.
• When projecting moving pictures in the dual-screen
mode or quad-screen mode, all the input signals
should be genlocked to synchronize with each other
with a phase difference of less than 5 µsec. The
projected moving picture not synchronized with the
reference picture will appear to have dropped
frames. A moving picture on the left screen for dual-
screen mode or that on the upper left screen for
quad-screen mode is regarded as a reference picture.
If you project still pictures and moving pictures
together, select the left screen for the moving picture
in dual-screen mode or the upper left screen in quad-
screen mode.
• When projecting signals with vertical frequency of
more than 1080 pixel such as UXGA and WUXGA
in quad-screen mode, a part of the displayed image
may be invisible.
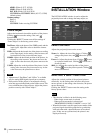
8
Click the “INSTALLATION” button to open the
INSTALLATION window.
9
Adjust the focus with the “Focus +/–” buttons under
“LENS CONTROL”.
During adjustment, “FOCUS” appears on the screen.
10
Adjust the picture size with the “Zoom +/–” buttons.
During adjustment, “ZOOM” appears on the screen.
11
Adjust the focus again with the “Focus +/–” buttons.
12
Adjust the vertical position of the picture with the
“Shift +/–” buttons.
During adjustment, “SHIFT” appears on the screen.
Note
Note
Notes