


8
Location and Function of Controls
Chapter 1 Overview
Location and Function of
Controls
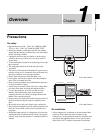
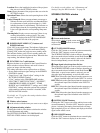
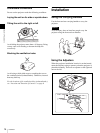
Projector Unit
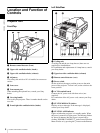
Front/Top
a Remote control detector (front)
b Upper side ventilation holes (intake)
c Upper side ventilation holes (exhaust)
d Adjusters
Use to keep this unit level if it is installed on an uneven
surface.
e Lens cover
f Lens mount part
When attaching the optional lens, consult your Sony
dealer.
g Carrying handle
Use to carry the projector. There is another handle on the
rear side.
h Front/right side ventilation holes (intake)
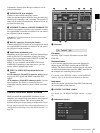
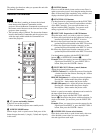
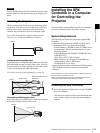
Left Side/Rear
a Cooling unit
A cooling fan and the two lamp houses (these are not
supplied) are installed here.
For installation and replacement of a lamp house, consult
your Sony dealer.
b Upper/rear side ventilation holes (exhaust)
c Remote control detector (rear)
d Power switch
Set the switch to the upper position to turn on the main
power of the projector. To turn it off, set the switch to the
lower position.
e AC IN terminal board
Connect the AC power cord with three wires (not
supplied).
For connection of the AC power cord, contact your Sony
dealer.
f STATUS MESSAGE window
Displays an error message. If the message is displayed,
contact your Sony dealer.
g STATUS LAMP indicator
Lights red when the projector is in standby mode. When
the power is turned on, it lights green. The indicator flashes
for about 10 minutes after the power is turned off by
clicking “POWER STANDBY 1” in the Control Function
Menu window or by pressing the 1 button on the Remote
54
12 3
67 8
5 6 9 qa
3
4
2
1
7 80 qs