Table of Contents
ii
P6434 Probe Instructions
List of Figures
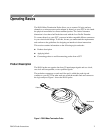
Figure 1: P6434 Mass Termination Probe 1. . . . . . . . . . . . . . . . . . . . . . .
Figure 2: Applying labels 3. . . . . . . . . . . . . . . . . . . . . . . . . . . . . . . . . . . .
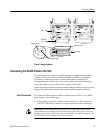
Figure 3: Connecting to a surface- or straddle-mounted connector 4. .
Figure 4: Connecting the Low-Profile Extender 5. . . . . . . . . . . . . . . . .
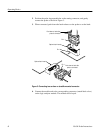
Figure 5: Releasing the probe tip from the latch housing 6. . . . . . . . . .
Figure 6: Latch housing dimensions 8. . . . . . . . . . . . . . . . . . . . . . . . . . .
Figure 7: Dimensions and placement of a surface-mounted
Mictor connector with latch housing 9. . . . . . . . . . . . . . . . . . . . . . .
Figure 8: Side view and dimensions of the Low-Profile Extender 10. . .
Figure 9: Surface-mounted connector layout (component side) 11. . . . .
Figure 10: Straddle-mounted connector layout (component side) 12. . .
Figure 11: Mictor connector pin numbering sequences
(component side) 14. . . . . . . . . . . . . . . . . . . . . . . . . . . . . . . . . . . . . . . .
Figure 12: Equivalent circuit for the P6434 probe 16. . . . . . . . . . . . . . . .
Figure 13: Equivalent circuit for the P6434 probe with a
Low-Profile Extender 17. . . . . . . . . . . . . . . . . . . . . . . . . . . . . . . . . . . .
Figure 14: Vertical dimensions of the P6434 probe and
Low-Profile Extender 21. . . . . . . . . . . . . . . . . . . . . . . . . . . . . . . . . . . .
Figure 15: Disassembling the P6434 probe tip 22. . . . . . . . . . . . . . . . . . .
Figure 16: Disassembling the latch release grip 23. . . . . . . . . . . . . . . . . .
Figure 17: Disassembling the module end 24. . . . . . . . . . . . . . . . . . . . . . .
Figure 18: Mictor connector circuit board and board holder 25. . . . . . .
Figure 19: Positioning the elastomer connector 26. . . . . . . . . . . . . . . . . .
Figure 20: Positioning the circuit board in the probe 26. . . . . . . . . . . . .
Figure 21: Reattaching the latch releases and case halves 27. . . . . . . . .
Figure 22: Reattaching the latch release cords to the latch releases 28.
Figure 23: Reconnecting the latch release cords to
the latch release grip 28. . . . . . . . . . . . . . . . . . . . . . . . . . . . . . . . . . . . .
Figure 24: Reassembling the module end 29. . . . . . . . . . . . . . . . . . . . . . .
Figure 25: Jumper and connector locations on the test fixture 30. . . . .
Figure 26: Example of the Activity Indicator dialog box 31. . . . . . . . . .
Figure 27: P6434 probe exploded view 37. . . . . . . . . . . . . . . . . . . . . . . . .


