


Printing Guide — Printing from Windows 231
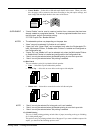
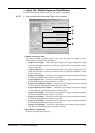
• B6 on B5 — Select this to print a B6 size booklet. Every 2 pages are printed on B5
paper to fit on half a sheet (B5).
• 1/2 LG on LG — Select this to print a 1/2 Legal size booklet. Every 2 pages are printed
on Legal paper to fit on half a sheet.
• 1/2 Comp on Comp — Select this to print a 1/2 Computer size booklet. Every 2 pages
are printed on Computer paper to fit on half a sheet.
• 1/2 Folio on Folio — Select this to print a 1/2 Folio size booklet. Every 2 pages are
printed on Folio paper to fit on half a sheet.
• 1/2 Statement on Statement — Select this to print a 1/2 Statement size booklet. Every
2 pages are printed on Statement paper to fit on half a sheet.
• 1/2 13’LG on 13’LG — Select this to print a 1/2 13inchLG size booklet. Every 2 pages
are printed on 13inchLG paper to fit on half a sheet.
• 1/2 8.5’SQ on 8.5’SQ — Select this to print a 1/2 8.5inchSQ size booklet. Every 2
pages are printed on 8.5inchSQ paper to fit on half a sheet.
• 32K on 16K — Select this to print a 32K size booklet. Every 2 pages are printed on
16K paper to fit on half a sheet.
• 16K on 8K — Select this to print a 16K size booklet. Every 2 pages are printed on 8K
paper to fit on half a sheet.
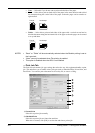
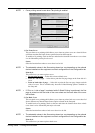
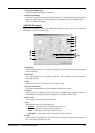
2) Center Margin
This sets the gutter on the center of two sided page. You can enter up to 0.500 inch (12.700
mm).
3) Outer Margin
This sets the gutter on the right side and left side on the paper. You can enter up to 1.00 inch
(25.40 mm).
4) Units
Select the unit for the Center Margin and Outer Margin option. The default unit varies
depending on the regional setting in the Windows.
5) Staple Down the Center
Check this to staple double in the center.
NOTES:
• “Staple Down the Center” is available only when “A5 on A4”, “A4 on A3”, “B5 on B4”,
“1/2 LT on LT”, “LT on LD”, or “16K on 8K” is selected at the Output Document Lay-
out drop down box and the Saddle-stitch finisher is installed.
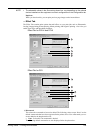
6) Number Pages from Right to Left
Check this to print a booklet that can be read from right to left.
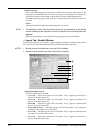
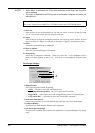
7) Use Front Cover
This sets front cover printing for a booklet which allows you to insert or print a cover on a
sheet fed from a different tray than the Paper Source option selected on the Setup tab.
To enable cover printing, check on the box and select the location from where a cover sheet
is to be fed and the print style.
Source
Select the location from where a cover sheet is to be fed.
NOTE:
• The selectable values in the Source drop down box vary depending on the optional
devices installed on this equipment and their configuration on the Configuration tab.
Print Style
This selects how you want to print a cover.
• Do not print on page — Select this to insert a blank cover.
• Print on both sides of page — Select this to print the first two pages and last two pages
on both sides of a cover.