


Network Operator’s Guide — Managing Templates 49
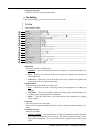
• Direct Transmit — Select the Direct TX mode to send the original as it is being
scanned. This mode is useful if you want a confirm from the remote party. Originals are
not stored to memory, and you can specify only one remote Fax at a time.
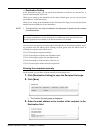
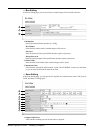
5) ECM
Enable or disable the ECM (Error Correction Mode) to automatically resend any portion of
the document affected by phone line noise or distortion.
6) Line Select
Select whether specifying the line to be used.
• OFF — Select not to specify the line to be used.
• LINE 1 — Select to use Line 1 for this Fax agent.
• LINE 2 — Select to use Line 2 for this Fax agent if installed.
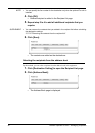
7) Quality Transmit
Select this to send a document in the Quality TX mode. This feature sends a document at a
slower speed than normal so the transmission will be less affected by line conditions.
8) SUB/SEP
Enter the SUB number or SEP number if you want to set the mailbox transmission.
9) SID/PWD
Enter the password for SUB or SEP if required.
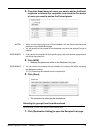
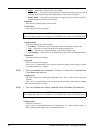
10) Polling
Select this to set Polling communications.
• (Blank) — Select the blank field when you do not want to perform polling.
• Transmit — Select this to perform Polling Reservation that allows users to store the
document in the memory.
• Received — Select this to perform Turnaround Polling that allows users to poll another
fax after transmitting documents to the remote Fax on the same phone call.
11) Password
Enter the 4-digit security code for the document to be stored or received.
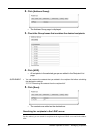
12) Fax Number (Security)
When you select “Transmit” at the Polling drop down box, enter the security fax number that
allows polling of stored document.
When you select “Received” at the Polling drop down box, enter the security fax number to
poll the documents from remote Faxes.
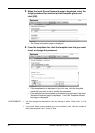
13) Delayed Transmit
If you enable the delayed communications for this agent, enter the day and time to send a
document.
14) Priority Transmit
Select whether the document will be sent prior to other jobs.